Bluetooth® Getting Started - Tags & Scanning
Learn how to easily set up and use Bluetooth® tags for seamless connectivity and enhanced device interaction.

Written by Matthew Clark-Massera
Updated at May 11th, 2026
Table of Contents
Visit our website for a quick explanation of the use of Bluetooth® in our device range and the applications that it enables.
In regards to Bluetooth® firmware and devices, it is critical that you upgrade to the latest firmware version and the latest Bluetooth® version. Later releases of device firmware may not be compatible with all versions of Bluetooth® firmware, and vice versa.
Device Support
Our devices are designed to efficiently scan and detect Bluetooth-enabled devices within range, capturing a broad spectrum of tags with strong signal quality. While they are capable of identifying a wide array of devices, the practical limit for simultaneous scans to our BLE gateways is dependent on the BLE module RAM and Processors on the device. This is different for each device, and encompasses all supported tag types, ensuring a versatile and inclusive connectivity solution.
Presented below is our selection of BLE Gateway devices along with their respective limits for the amount of tags they can scan and store on their tag list.
Device |
Practical limit |
Arrow Global BLE |
50 (pending optimisation) |
Dart3 4G BLE |
100 |
Dart3 Global |
100 |
G70 4G BLE |
100 |
G150 Global rev1 |
100 |
G150 Global rev2 |
1000 |
Griffin Air |
100 |
Oyster3BLE |
100 |
Remora3 |
100 |
Remora3 Global |
100 |
Manta Fusion CatM-NB |
100 |
Oyster Edge |
100 |
Oyster3 4G BLE |
100 |
Hawk BLE Card |
1000 |
Eagle (EoL) |
512 |
G120 (EoL) |
512 |
Remora2 (EoL) |
512 |
Update to Latest Firmware
See how to upgrade Bluetooth® firmware versions below, and device firmware versions here
Setting the Bluetooth® Firmware
If you have just booted the device for the first time, it is likely that it has a production level of Bluetooth® firmware installed (which may be a bit outdated) and you'll need to upgrade the firmware.
- Select the wrench in the device grid for the specific device,
- Open the Firmware Update menu
- Select 'set Bluetooth® firmware'


Enabling Bluetooth® functions
If you intend on using any type of Bluetooth® functionality on your Digital Matter device, you will need to ensure that the system parameter 'BLE Global Settings' is enabled.
To work with the system parameters, select the device in the oemserver.com device grid, and click on 'Parameters' >> Set System Parameter (single device)

Note: The "BLE Global Settings" tab is only available on older DM devices such as the Remora2, G120 and Eagle. On newer devices, you just need to configure "BLE Tag Scanning" to enable scanning.
Choosing Scan Length
When choosing the scan length for your Bluetooth® device you are balancing the power usage and accuracy. If the scan is too short you may miss nearby tags but if it is too long you are wasting power.
Finding the Balance
The first thing you must consider is how often your Bluetooth® tags advertise their data. This is called the "advertisement interval" and can typically be configured or found in the device's datasheet. You should ensure that the Bluetooth® scan length is at a minimum the size of the longest advertising interval used by your devices. You may require a longer scan time than the longest advertising interval as interference from other devices could mean tags are missed.
The next thing you must consider is whether you are using multiple scanning technologies (see here). If you are using both long-range and standard Bluetooth® then you should at least double the scan period.
Example
We have three different tag types:
- A Guppy which has an advertising interval of every 1 second
- An Eddystone tag which has an advertising interval of every 5 seconds
- An iBeacon which advertises every 100 milliseconds
Clearly, the longest advertisement period is 5 seconds. We want to reduce the chance of missed data so should set the scan period as a multiple of 5 seconds. We test a scan period of 5, 10, 15 and 20 seconds, and find 5 and 10 seconds occasionally miss these Eddystone tags but 15 and 20 seconds work consistently. We therefore set the tag scan time to 15 seconds to reduce power consumption.
Periodic Scanning
Periodic scanning is for when you have either a static or moving gateway that you need to scan for Bluetooth® tags upon conditions being met, for example, start/end of trips or specific time periods.
The device will get a GPS fix prior to conducting a periodic scan.
Parameter Details
Scanning Settings
| Parameter | Description |
|---|---|
| Scan on Trip Start | Yes/No to scan for Bluetooth® tags on movement |
| Trip Start Scan Offset(seconds) | Set period of time to elapse after the trip started to scan |
| Scan on Trip End | Yes/No to scan for Bluetooth® tags on the end of movement. |
| In-Trip Scan Period (mins) | The time period in minutes between Bluetooth® tag scans while in trip. set 0 to disable |
| Upload on in Trip Scan | Yes/No to enable upload to the server of tag data while moving. |
| Out of Trip Scan Period (mins) | Time period to scan for Bluetooth® tags while not moving |
| Upload on out of Trip Scan | Yes/No to upload scan data while not moving |
| Scan Length | Set Scan length time. See Choosing Scan Length (section above) for more information |
| Scan Length units | Seconds/Minutes |
| Minimum Tag RSSI (dBm) | Set a minimum strength of the signal to classify a tag as 'Found' or 'Lost'. Insert a negative number eg. -60 |
| Device is Stationary | Yes/No to declare whether the device is in a fixed location |
| Upload on Empty Tag List Scan (Oyster3 4G Bluetooth, FW 1.5+) | Yes/No to declare whether the device will upload after a scan if the scan has returned an empty tag list |
| Upload on Populated Tag List Scan (Oyster3 4G Bluetooth, FW 1.5+) | Yes/No |

Tag Settings
| Parameter | Description |
|---|---|
| Enable DM Tag |
Enable the identification/logging of the DM Guppy, DM Barra Radar* & SensorNode tag types *Barra Radar BLE - Manta Fusion & Hawk supported. Please see link for here additional steps for the Hawk setup |
| Enable iBeacon Tags | Enable iBeacon Tag types |
| Enable Eddystone Tags | Enable Eddystone Tag types |
| Other tag type 1,2,3 | See Integrating tag types here |
| Log Tag Lost (stationary mode) | Log a 'Tag Lost' record in telemetry when a consecutive scan does not renew a tag record. |

Continuous Scanning
The Continuous Tag Scanning parameters are more tuned towards logging when tags are found or lost, rather than whether they're present when a scan is executed. This option is currently only available on the G120 4G, G150 and Eagle.
| Parameter | Description |
|---|---|
| Enable Scanning | Yes/No to enable Continuous Scanning, this will disable Period Scanning if enabled. |
| Upload on Tag Found | Yes/No to upload upon finding a new tag |
| Upload on Tag Lost | Yes/No to upload upon losing a tag |
| Upload on Update Log | Yes/No to uploading upon consecutive tag scan |
| Update log Period (mins) | Period between logging tag list. Entering in 0 will disable |
| Tag Expiry Time (s) | Time to elapse until Tag is declared Lost |
| Device is Stationary | Yes/No to declare whether device is in a fixed location |
| Fixed Lat (stationary mode) | Yes/No |
| Fixed Long (stationary mode) | Use this function to manually input gateway Longitude/Latitude |
| RSSI Threshold-Tag Find | Strength of signal to determine whether a tag is considered found. Insert a negative number eg. -30 |
| RSSI Threshold-Tag Lost | Strength of signal to determine whether a tag is considered lost. Insert a negative number eg. -60 |


Integrating Tags
If you require a tag to be integrated into Telematics Guru or require a complex device integration, then contact your local Digital Matter representative. However, if you simply want to test a device on OEM, or want to integrate a device onto a platform other than Telematics Guru, then you can integrate the tag using the device's system parameters.
To read more about Integrating tags and the process, continue here
The following tags have been integrated into device Firmware and into Telematics Guru.
- Digital Matter Tags (Guppy BT, Barra Radar*, SensorNode BT)
- *Barra Radar BLE - Manta Fusion & Hawk Supported for Tag List - other BLE devices can use user integrated tags with analog mapping.
- Apple iBeacon
- Eddystone
- Ingics iBS01 (Basic tag)
- Ingics iBS01T (Temperature / Humidity)
- Technoton DUT-E S7 Fuel Level Probe
Other tags can be integrated, contact Digital Matter for Support.
Using Tags in Telematics Guru
The flow of data from the tag to TG is as follows:
|
Point 1 Bluetooth® Tag/Sensor |
Point 2 DM Bluetooth® Gateway Device |
Point 3 Gateway device transmits data to TG |
| Transmits a beacon every 2 seconds containing the tag or sensor data | Scans for tags either periodically or continuously and maintains a list. An update is sent to the server if the tag is 'Lost', 'Updated' or 'Found'. |
Log reason 50 is used to indicate the upload is due to tag activity. These logs can be used to display the data meaningfully. |
Adding Tags to Telematics Guru
To set up a tag in Telematics Guru, is the same process as creating an asset. You can see the full guide here
Accessing Tag Locations and Telemetry
There are now two places where you can view the location of Bluetooth tags. The Live map and the Tags section.

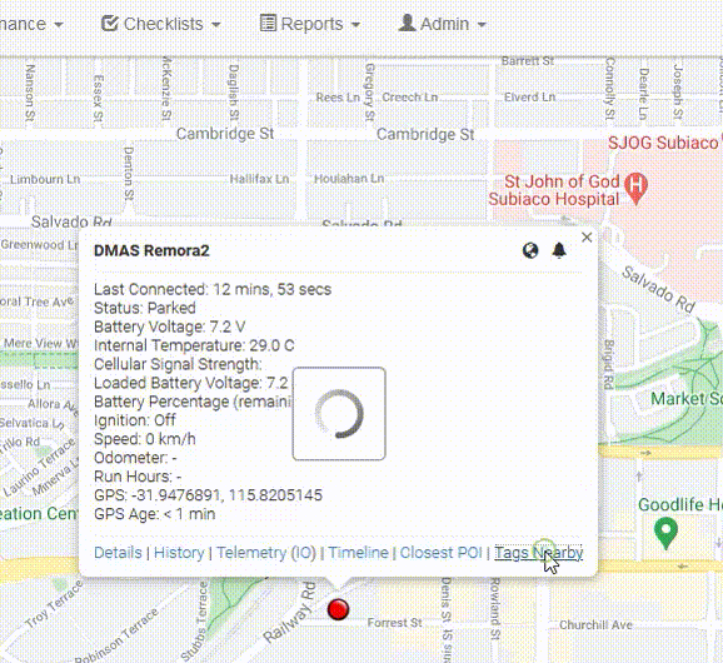
Tags on the Live Map
When you click on a gateway asset on the live map, there is an option to show 'nearby tags'. This link will list the tags that were scanned by this gateway.
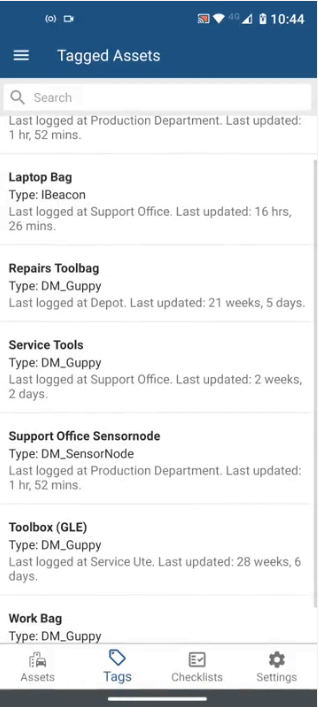
Tags in the Mobile App
Tags can be viewed in the app. Simply head to the tag menu. Tags can be searched for in the list and viewed on the map.
Tags in the Tags Menu
The Tags menu contains three sections. Tagged Asset Status, Tagged Asset Map and Tagged Asset Telemetry.
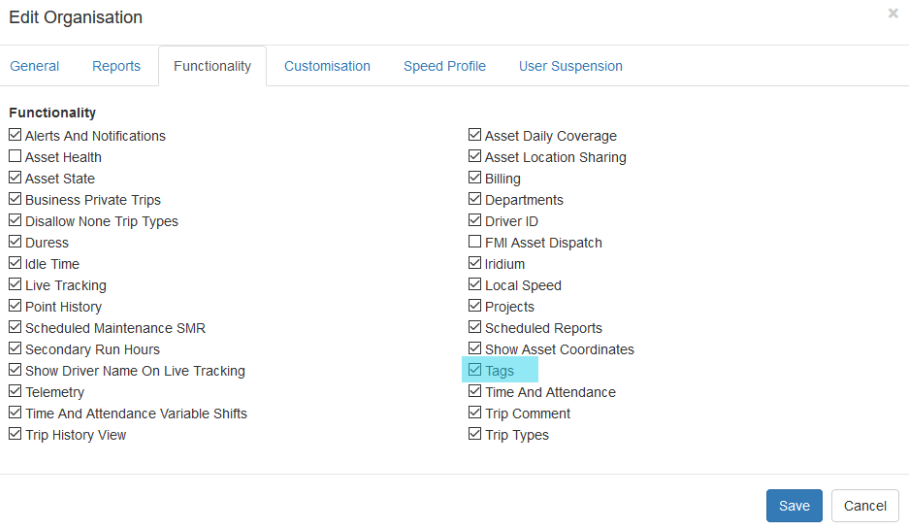
For this view to be visible the Organisation must have this functionality enabled. To check organisation functionality go to Admin -> Organisation -> Edit Organisation and ensure the Tags functionality is selected.
To access Tag information, there are three levels of Tag data displayed; Status, Map and Telemetry.
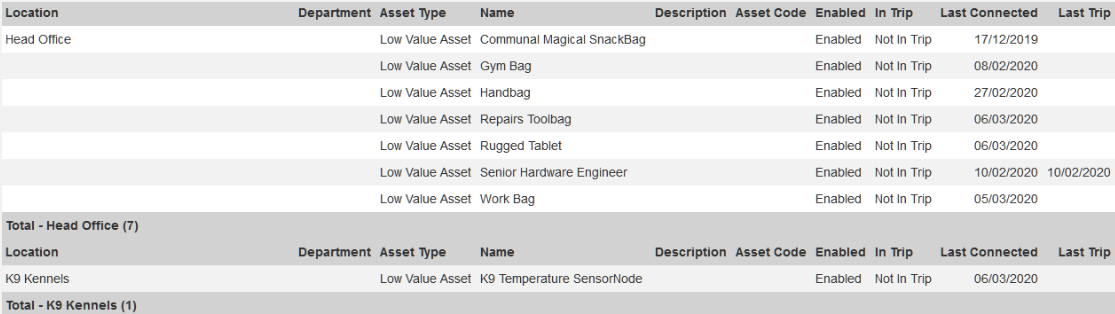
Tag Status
This lists all of your tags in one place, their location and the time they were last scanned and the gateway that scanned the tag.

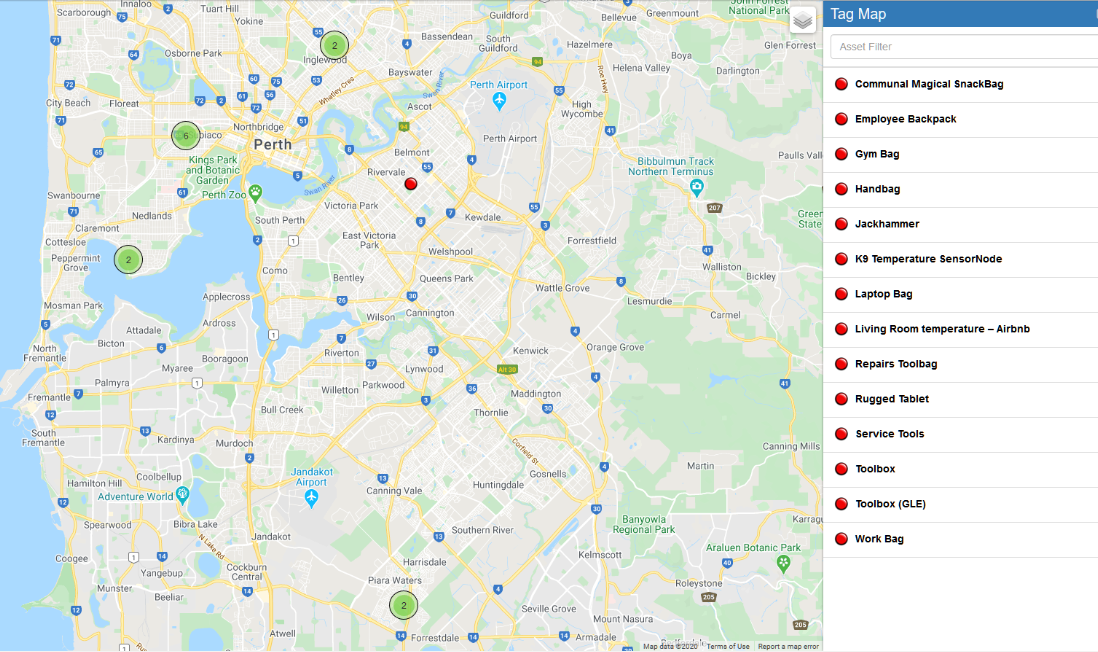
Tag Map
This screen displays all of your tags on a map, with cluster view.
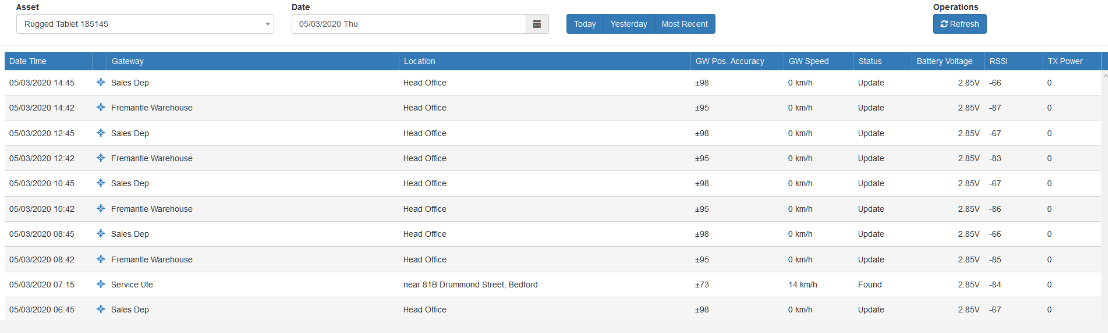
Tag Telemetry
This screen lists all the previous scans and the status of each tag separately and includes other statistics included in the tag's payload such as battery voltage, RSSI and Tx power.
Tag Location Reports
If you want an easy-to-digest list of where your tagged assets were last reported, you can run the 'Asset Location' report. If you've set up an 'Asset Type' for all of your Bluetooth® tagged assets, you can filter the report to display only the tags, and no other devices.
Configuration Examples
1) Remora3 scanning for DM Guppies only, every 30 minutes, uploading every 4 hours out of trip.
First, set up your OEM Server parameters and make sure to upgrade your firmware and Bluetooth firmware.
The first tab to add is BLE Tag Scanning. Here we can configure the scanning interval. The relevant parameters are highlighted, all others are left on defaults (left untouched)

Setting the In Trip Scan Period and Out of Trip Scan Period to both 30 mins means we scan every 30 minutes always whether in or out of trips. Uploads on scans are disabled - but this just means that an upload won't occur specifically due to a tag scan. Heartbeats and uploads due to trips will still upload all the logs currently on the device.
By default, there is an upload every 30 min while in trip anyway, so no need to double up here.
The final parameter needed is to set the heartbeat to 4hrs (240 min) under Basic Tracking.
We can see from this tab the In Trip Upload Period is 30 min as discussed.

Once again, we start by setting up your OEM Server parameters and make sure to upgrade your firmware and bluetooth firmware.
The tab to add for this example is 'BLE Continuous Tag Scanning'. This tab looks different to the Periodic and Tag Scanning tabs because you don't configure the time periods for the scanning, but rather the actions taken when tags are found or lost.
First, we enable the scanning mode by selecting Yes, and turn on Upload on Tag Found and Upload on Tag Lost. To upload when a tag has been scanned for a set amount of time, enter the time desired in the 'Update log period' field, here we have used 60mins.
A Tag in this example will be considered lost if it is not scanned for 60 seconds.