Configure I²C Sensor Readings

Written by Matthew Clark-Massera
Updated at May 27th, 2024
Table of Contents
The I²C interface is commonly used for connecting sensors to data-logging devices like the Hawks. I²C Sensors use 3 lines
- Power (typically 3V3, but sometimes 5V)
- SDA (Serial Data Line) - data is transmitted over this line
- SCL (Serial Clock) - Clock signal
I²C is a multi-controller/multi-target interface - meaning multiple sensors can be connected to the same bus (i.e. you can wire in multiple I²C sensors into the same terminals on the Hawk.
Multiple sensors are managed as each sensor can be given a unique address (the Hawk uses 8-bit addresses). The Hawk will specify which sensor it is aiming to read from.
This means if you want to use multiple of a specific sensor, it will work provided you can give them different addresses.
Some sensors are only sold pre-configured with a single specific address meaning only one will be able to be used.
Manually setting an I2C Address
Typically, I2C addresses are 7 bits long with an 8th read/write bit.
Our interface includes this final bit as a 0.
Therefore, if you need to manually set the I2C address for the sensor, ensure you add a 0 to the end of the binary address.
i.e. Double the decimal version of the address.
You should only need to manually set the address if you are connecting two sensors of the same type to the same I2C bus.
Wiring
To properly use an I2C sensor with the Hawk, you need to wire it sensor into:
- I²C SDA
- I²C SCL
- The Vboost or 3v3 Switch Power on the Hawk Card (Depending on your sensor, usually 3V3)
For details on different cards IOs, please see this article.
Key connections for an I²C sensor are on the Agtech1 are:
| Function | Hawk IO | |
| I²C SDA | 4 | Connect to sensor SDA |
| 3.3V output | 5 | Connect to sensor 3V3 |
| I²C SCL | 6 | Connect to sensor SCL |
Configuration
Configure Task
We must configure a task and set I²C Action 1 and/or I²C Action 2 as one of the task actions.
This means currently we can configure readings from 2 sensors. If you require more readings, speak to our support team.

Above - Do I²C Action 1 and 2 hourly (sample sensor and log) - and upload the readings every 4 hours.
Example: Configure I²C Action on the Agtech1
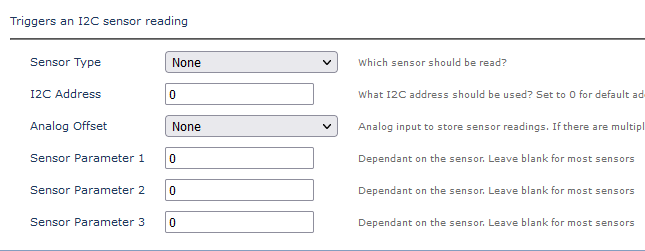
Sensor Type
Chose your sensor type from the dropdown
Specific sensors need to be integrated. Contact our support team to discuss options if you have a sensor not listed you wish to use
I²C Address
Typically leave as 0 to use the default address for the sensor integration
If you have multiple sensors with multiple addresses you would set the sensor address to read from here
Analogue Offset
Set the Hawk Analogue Input to log the sensor reading to
The offset is where the first reading will be stored (some sensors return multiple readings)
It is important to be aware of sensors which return multiple values to avoid clashes. Generally, it is best to use analogues 10+ to avoid any clashes
Sensor Parameter 1-3
Some specific sensors have additional parameters which these fields are used for. For the majority, this can be left blank