Parameter examples: Cold Chain Tracking

Written by Matthew Clark-Massera
Updated at May 22nd, 2024
Table of Contents
Cold Chain Tracking allows the user to:
- Track the real-time temperature
- Receive an alert if the temperature drops below or rises above the enabled Temperature Low and/or High Thresholds, respectively.
- Provide data on operational temperatures to ensure adherence to guidelines
We will be covering three different types of Cold Chain tracking. There are other combinations that you can use that are listed below.
- A stationary Falcon monitoring a cool room
- A Falcon installed in a vehicle tracking the movement of the vehicle + temperature of the refrigerator
- A G120 and SensorNode Bluetooth® wireless temp monitoring solution
Cold Chain Capable Devices
| Device | Suitable for |
|---|---|
| Remora2 | Long life Battery Powered device without direct inputs. Can pair with Bluetooth temperature sensors |
| Eagle | Can run on battery or Direct power. Bluetooth capable with multiple direct sensor inputs (i2C, RS-485 & SDi12) |
| G120 | Direct power with higher rate of Vehicle tracking & Bluetooth pairing to sensor |
| Falcon | Can run on Direct power with battery backup, direct i2C sensor inputs. |
Wiring Set up of Temperature Sensors
Instructions for wiring up Sensors
Please see these links for wiring instructions for the Falcon, the Eagle and the SensorNode Bluetooth
Stationary DevicesBelow is an example of setup for a Falcon installed in a fixed location, periodically sampling and uploading temperature readings. i.e. a device installed fridges/cool rooms and controlled environments. In this case, the goal is to monitor temperature of a cool room and alert if it falls out of the acceptable temperature range 2°C to 6°C. In parameters these are set as our Low and High Thresholds, respectively. We want to take a temperature sample every 10 minutes and upload every 4 hours but if a threshold is breached we want an upload. Note, since we sample every 10 minutes, this is the potential delay we may see in receiving an alert . The device can only determine that it is outside the configured threshold as each sample is taken. So we must make sure we set the device up to sample often enough to support prompt alerts (10 min is sufficient here). This System Parameters template can be found on OEM, called 'DM Demo - Cold Chain Tracking (Static)'/DMA Demo - Cold Chain Static'. Setup:
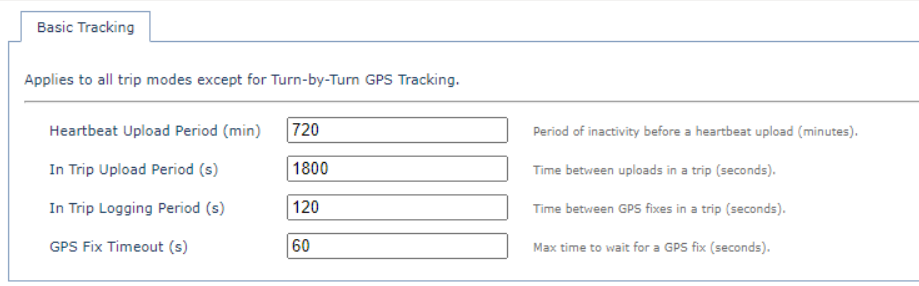
NoteOnce you set the Mode to periodic tracking, the other settings that are trip related will not affect the parameter setup when configuring your device. Under the Basic Tracking parameter tab, the 'Heartbeat Upload Period' is set to 720 minutes (12 hours) by default. This allows for a refresh of the GPS fix twice a day. The In Trip parameters are disabled due to the periodic tracking mode selected previously.
If you're using a single Digital Matter temperature probe, add in the DM Temp Sensor 1 parameter tab. This tab sets the Analogue input number to write the data to. This is Input 8 by default on the Falcon and Eagle devices.
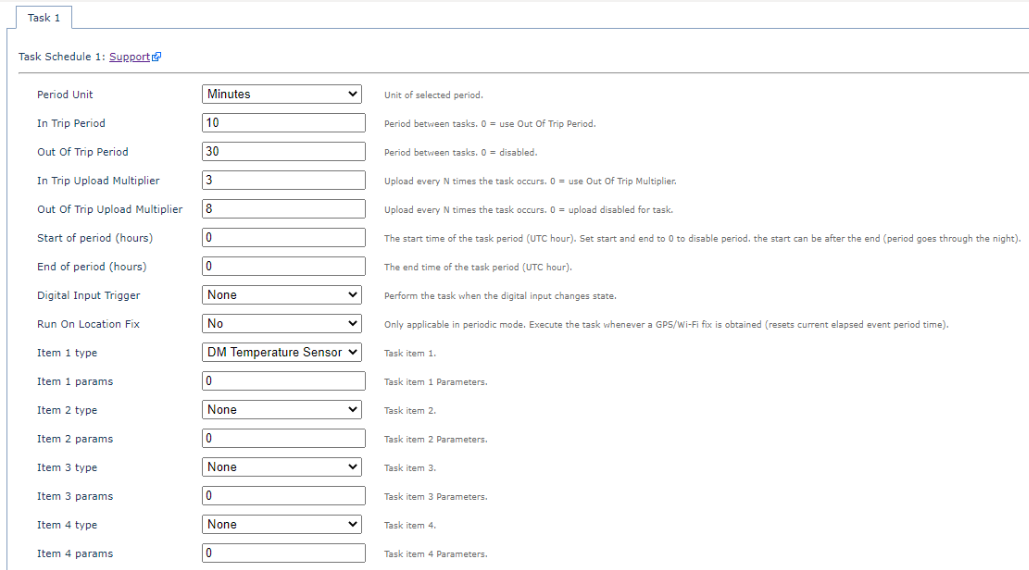
In the Task 1 parameter tab, because we have set the device to 'Periodic Tracking Only', the Out Of Trip Period/Upload Multiplier is set and the In Trip Period/Upload Multiplier are disabled. The other parameter options are as follows:
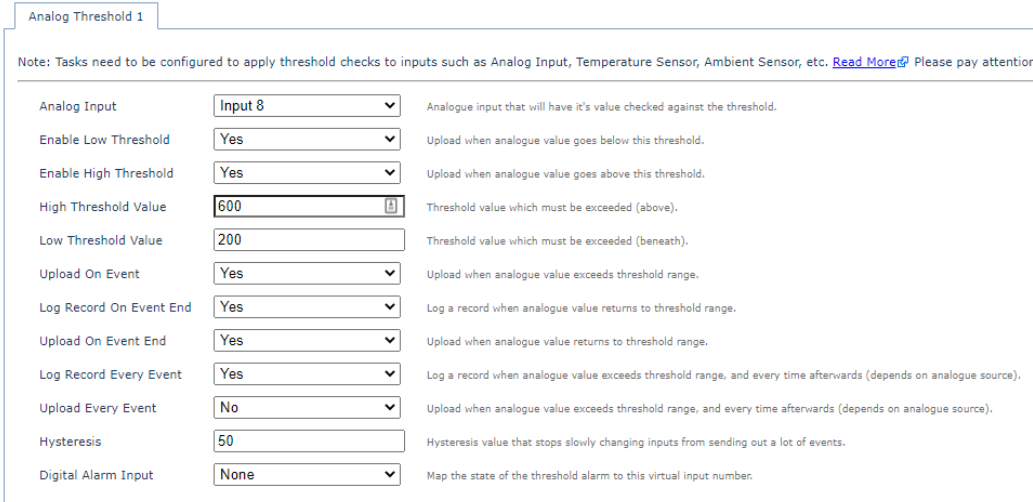
The Analogue Threshold 1 parameter tab allows you to set the Low and High Temperature Thresholds 'Analog Input' refers to the above 'Log Analogue Num' you selected in the previous parameter setting, i.e. Input 8. See below for further parameters.
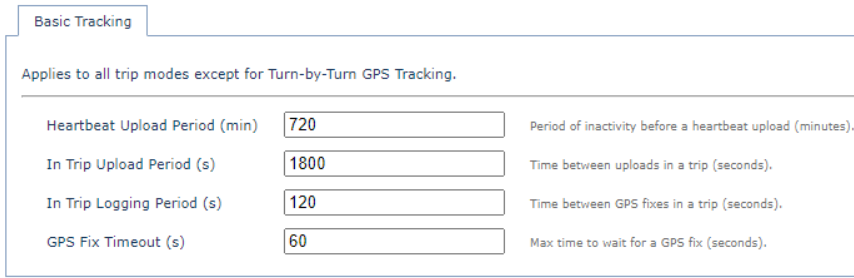
Moving AssetsAnother cold chain scenario is a moving refrigerated vehicle such as food vans, medical couriers and refrigerated trucks. In this example, we want the device to upload every 30 minutes while in a trip and log a GPS fix every 2 minutes. We also require the device to upload at the start and end of every trip with temperature samples at 10 minute intervals which will be uploaded as part of the trip upload, or at the end of the trip, which ever comes first. A System Parameters template can be found on OEM, called 'DM Demo - Cold Chain Tracking (Mobile)' and 'DMA Demo - Mobile Cold Chain.' Basic tracking settings are left on default. Since we'll be using standard GPS tracking mode, these parameters will be in effect when the asset has detected it's moving. We can adjust the log and upload settings if we want to suit battery life requirements.
Add Task 1 to the parameter selection and set the Period unit to minutes. Since we want the sensor to log every 10 minutes in trip, and upload every 30 minutes, and every 30 minutes out of trip and upload every 4 hours we set the following settings:
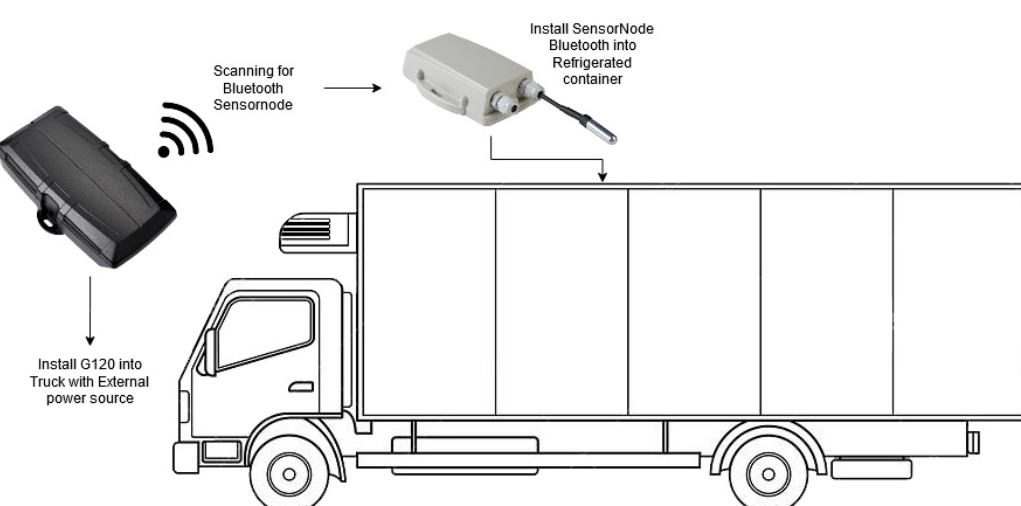
SensorNode BLE for wireless temp sensingBluetooth Cold chain tracking requires a few more moving parts than the other Cold Chain methods, but allows for wireless temperature sensing. The typical device selection is a G120 is installed in the truck under the dash to provide tracking of this vehicle. Then a SensorNode BLE can be placed in the rear of the truck (i.e. with the refrigerated cargo). No need for long or messy cable runs and installs. If you have another Bluetooth sensor you'd like integrated, please contact your local Digital Matter support team Setting up Bluetooth DevicesTo get started with Bluetooth devices, please read our articles on upgrading bluetooth firmware and Setting up the Sensornode Bluetooth
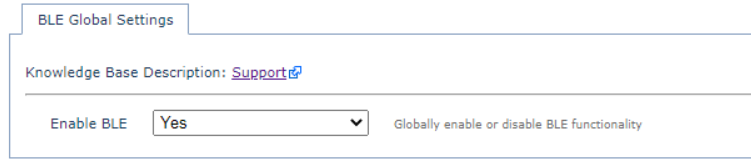
For this guide, we are going to be using a G120 with the Sensornode Bluetooth to log a temperature sample every 10 minutes in trip and upload on next upload. When the asset is out of trip state, we want to log a temperature sample every 15 minutes and upload every hour. Be sure to set your BLE Global Settings to enabled to begin.
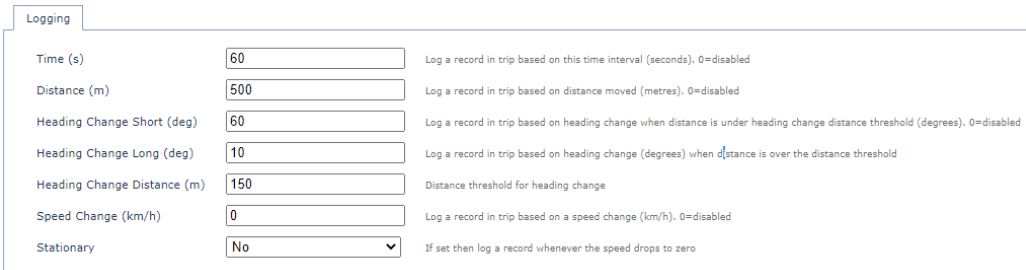
The default logging parameters for the G120 are as below. So a log will be generated under these conditions (i.e. usually every 60 seconds while driving) If we aren't really concerned about temperature while the truck is not on the move, we don't need to set up the device to log specifically when it receives data from the SensorNode - the in trip logs will be enough - we will still get temperature updates every 60s.
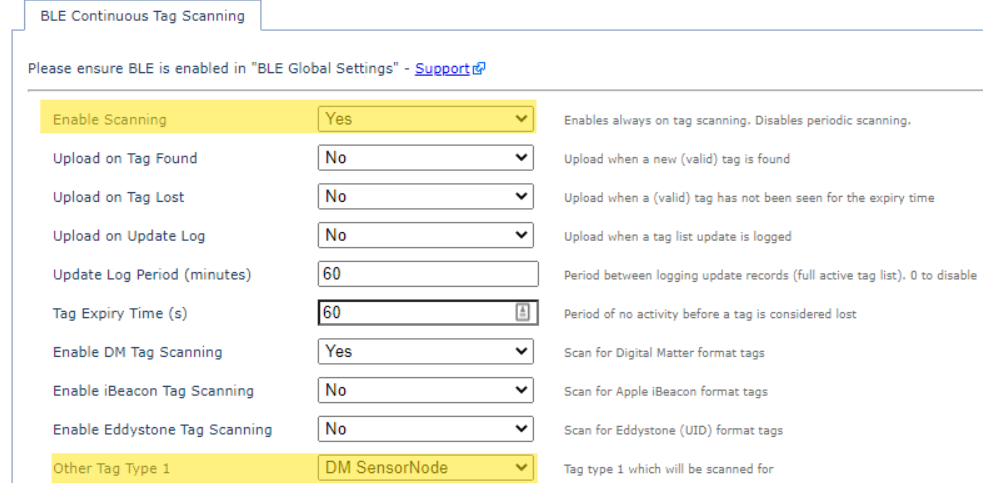
Then we configure the device to scan continuously for Bluetooth Tags which are in range. Ensure to enable scanning and for SensorNodes to be scanned for:
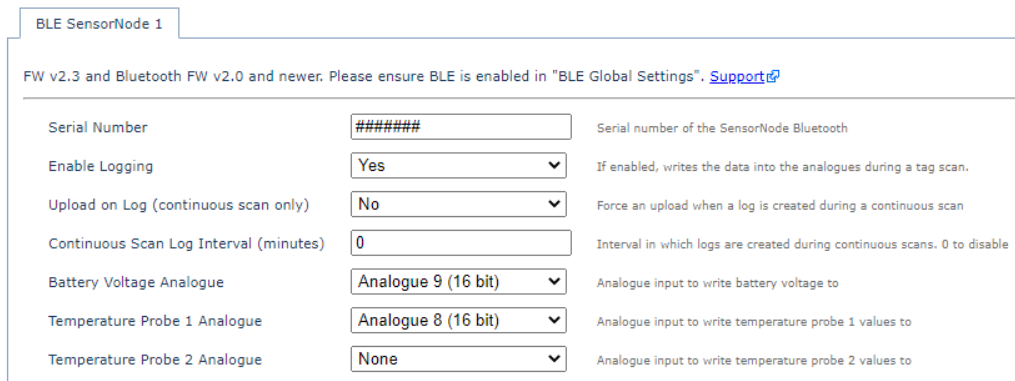
Add the BLE Sensornode 1 tab and input the serial of the Sensornode.
With all of these settings, the G120 will constantly read the temperature reported by the SensorNode Bluetooth - and update the value to the server along with it's usual tracking logs (i.e. every 1hr when stationary, every 60 sec while on the move) If we need more temperature updates while out of trip, we should set Upload on Log to Yes, and set a Scan Log interval that is |