Fuel Level Monitoring - Reading Technoton DUT-E S7 and Escort Probes
Table of Contents
We have integrated 2 different Fuel Probes into our device FW, such that they can be read by our BLE gateway devices the G120, G150, Remora2, Remora3, Oyster3-4G-BLE and Eagle. This enables fuel level monitoring solutions to be provided! While it is possible on all the aforementioned devices, the G120 and G150 are best suited. It can be hard-wired into a vehicle to provide live location updates, and additionally it will continuously scan for the probe - whereas the Remoras and Oyster3-4G-BLE only do this periodically. The fuel probe can then be installed in the tank.
Integrated Probes
These are not the only probe or sensor on the market - and it is an example of the variety of solutions that Bluetooth capability on our products provides. Contact your local support team about other sensor support (may require firmware integration)
DM do not stock 3rd party probes and tags and they need to be purchased from the manufacturer or other suppliers directly. Be sure to consult the specific product documentation for installation and set up requirements for these probes.
This guide covers how to set up our devices to receive the probe data, and only briefly touches on the probe setup.
There are two methods for reading the data. In most scenarios the Analogue Mapping method is preferred.
Analogue Mapping
- The probe data is read by the device, and the Fuel Level is written to an Analogue Input, and sent as part of the device data.
- This is available on the Remora3 Global G120, G150 and Eagle
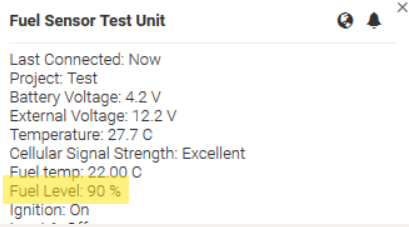
- This method works with Telematics Guru - and means the Fuel Level can be displayed on the Live Screen (just Edit the I/O Mappings)
- Only 2 Fuel Level Probes per device can be supported (though typically this is more than enough) It also means a probe is 'linked' to a Remora3 Global/G120/G150/Eagle. So, you know the fuel level for a particular asset.
Tag Type
- The probe is treated as a BLE tag, and the data is sent in the tag list.
- This is available on the G120, G150, Eagle, Remora2, Remora3 and Oyster3-4G-BLE
- This is not integrated into Telematics Guru, but 3rd party platforms can utilise the method
- There is no limit on the number of probes that can be used by a device.
- Any BLE gateway (i.e. Remora2, Remora3, Oyster3-4G-BLE, G120, G50, Eagle) can pick up the reported fuel level.
- This method is highly flexible - but perhaps flexibility isn't required for this application.
Currently Supported Methods (Jan 2024)
Be sure to update device and BLE firmware to the latest versions to ensure full functionality.
| Device | Analogue Mapping Method | Tag Type Method | ||
| Technoton | Escort | Technoton | Escort | Technoton |
| G120 | ✓ | ✓ | ✓ | ✓ |
| G150 | ✓ | ✓ | ✓ | ✓ |
| Remora2 | No | No | ✓ | Pending |
| Remora3-4G | No | No | ✓ | ✓ |
| Remora3-Global | No | ✓ | ✓ | ✓ |
| Eagle | ✓ | Pending | ✓ | Pending |
| Oyster3-4G-BLE | No | No | ✓ | ✓ |
The analogue mapping method is unable to be implemented the Oyster and Remora3-4G. Only the tag method is possible.
Basic BLE Scanning Setup
To be able to scan for and read the Bluetooth Fuel Probe, first Bluetooth scanning must be enabled on the device.
See - Set up Bluetooth Scanning for instructions.
Probe Installation
For a complete guide, check the manufacturer provided manual available on their site.
Analogue Mapping Mode
Parameters for the G120, G150 and Eagle.

- Serial Number
- Technoton: The serial number is printed just below the head of the probe, on the piping, in decimal format. Convert this to hexadecimal and enter as the Serial Number parameter.
- Escort: The MAC Address is printed on the head of the probe, underneath the cab. This is already in hex so enter exactly this value for this parameter.
- Enable Logging: Set to yes to enable analogue mapping.
- Upload on Log: set to Yes if scanning continuously on the Eagle, G120 or G150 to force an upload every log interval. This may not be needed as all the logs will be updated with other uploads (i.e. the in trip 30s uploads on the G120/G150)
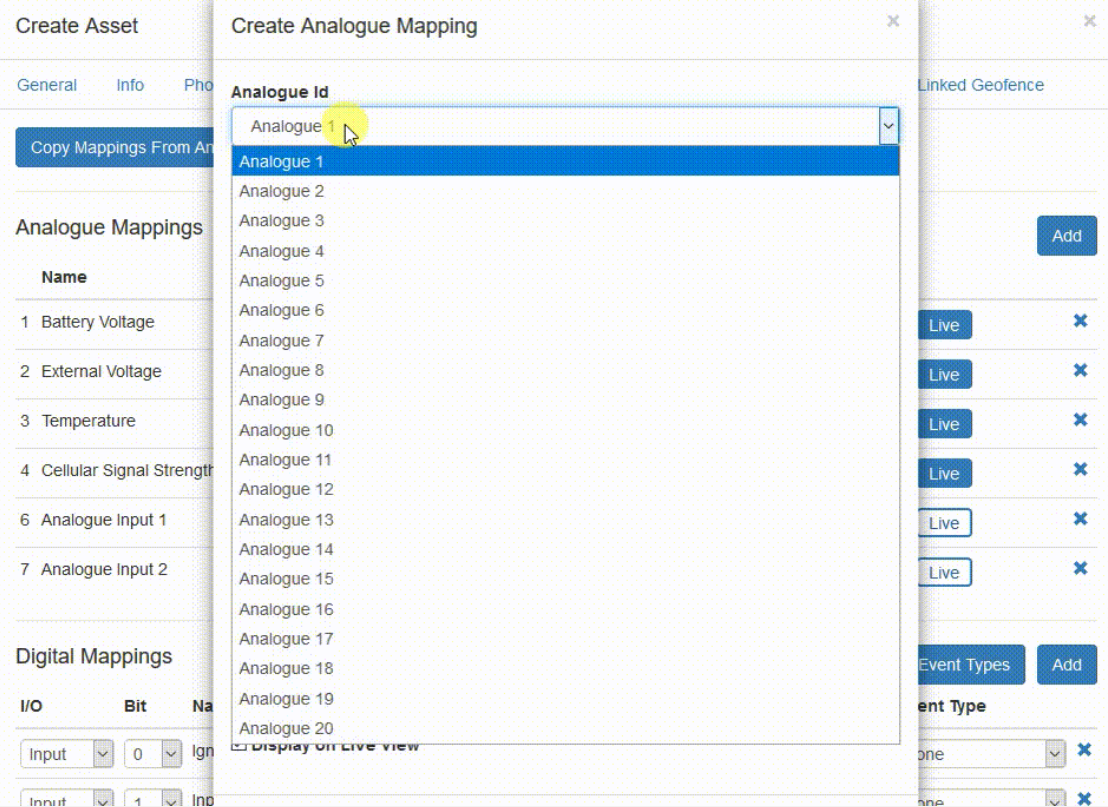
- Fuel Level Analogue/Temperature Analogue - Analogue 11-20. None of these are defaults on the devices so any is fine, but be sure not to clash with any other inputs you may have already mapped in parameters.
- Continuous Scan Log Interval - The time period between logs in continuous mode. If this is set to 0, then the device only puts the values in the analogues and will be captured in logs from other sources (30 second in trip logging for example). In periodic mode, the values always gets logged with the tag list.
Parameters for the Remora3 Global.

- Serial Number. Use the Fuel Tank Monitoring app covered in the manufacturer's manual to get the MAC address of the probe.
- For example, the MAC address 00:18:E9:E4:CE:6C will be input as 0x0018E9E4CE6C.
- Fuel Level Analogue/Temperature Analogue - Analogue 11-20. None of these are defaults on the devices so any is fine, but be sure not to clash with any other inputs you may have already mapped in parameters.
Calibration (Technoton)
The steps for calibration via the app are covered in section 2.4 of the manufacturer's manual. We are following a similar process here however entering the required values in to the device parameters rather than an app.
- Enter the probe's cut length into Probe Length
- Set Calibrate Mode = Yes, and ensure the parameters are updated on the device. This will write the raw frequency value (x1000) into the analogue you selected in Fuel Level Analogue
- Set the Empty Level Frequency
- The empty frequency needs to be determined. Ideally, fit the probe into the empty tank - and ensure there is no fuel on the probe (leave it to dry for a while). If this can't be done. Just remove the probe from the tank altogether.
- Leave for a few minutes and then check your Fuel Level Analogue - enter this value divided by 1000, rounded to a full number into Empty Level Frequency. E.g. value of 1688737 reported in the analogue, enter 1689 in parameters in OEM.
- Set the Full level frequency
- Same steps as (3) - but insert the probe into the full tank and repeat. - entering the reported value as the Full Level Frequency.
- Change Calibrate Mode back to NO and save the parameters.
Once complete - the probe will now report the fuel level (i.e. the length along the probe at which fuel sits) - in increments of 0.1mm into the analogue.
E.g. for a 700mm probe:
- full is reported as 7000 (i.e 700mm) - top of the gauge
- Half full (50%) would be 3500
- Empty would be 0
Calibration (Escort)
The calibration on the Escort probe is handled by a free app. Check the manufacturers manual for details. Process is similar, full/empty must be set. Once calibrated the probe simply reports the correct value. So all that must be set is the parameters described above.
- Serial - The MAC address is printed on top of the probe, under the cap. Simply copy this directly into this parameter (no conversion necessary)
- Enable Logging = Yes
- Upload on Log = Yes if scanning continuously
- Fuel Level Analogue
- Continuous Scan log interval.
Once calibrated, the device will send the values 0 (empty) - 1023 (full), or 0 (empty) - 4095 (full) - depending on what is configured in the app.
Tag Type Mode
Parameters

Simply set Technoton or Escort Fuel Sensor as a Tag type under the BLE Periodic or Continuous scanning settings depending on which you are using. No other set up needs to be done. See the Bluetooth Tag Types section in the integration documents for information on the payload that will be sent within the tag list.
Technoton Probe
The raw frequency value is sent, so the server must do the conversion from frequency -> fuel level. To do this, the server will need to know the probe length, empty frequency and full frequency.
Escort Probe
Since the calibration is already done on the probe via the app, the correct value is sent straight to the server. In the Analogue Mapping method the device is doing the conversion for the Technoton probe.
Set up in Telematics Guru
Analogue Mapping in TG
To best display the fuel level values - the analogues need to be 'mapped' in TG.
On the edit asset page, navigate to the I/O Mappings Tab and create an analogue mapping. Ensure that Display on Live View is ticked so that the fuel level shows against the asset on the live screen.

Conversion Factor for Technoton Probe
As mentioned above, the Technoton probe reports the depth of fuel - which will be of the range 0 -> total probe length.
Different tanks will have different length probes - and thus report different values when full/half full etc. The conversion factor can be set on the analogue mapping in TG - as this converts the analogue value into a more useful percentage.
The conversion factor is simply 100 ÷ (probe length x 10).
I.e. for a 700mm probe, the analogue values which are reported by the G120 will range from 0-7000.
So we must convert this range to percentage - i.e. 100 ÷ 7000 = 0.014285 - and we use this conversion factor in TG.
Conversion Factor for Escort Probe
If sending 0 - 1023, the conversion factor is 100 ÷ 1023 = 0.09775
If sending 0 - 4095, the conversion factor is 100 ÷ 4095 = 0.02442
Asset Analogue Value Report - Fleet Current Fuel Level
To view the current fuel level reported by all assets, you can use the Asset Analogue Value Report.
This report allows you to generate a snapshot of all analogue values across devices, able to be limited by projects, departments, device type, asset type or specific serials. This report can be scheduled if you require readings at specific times or intervals.

Alerts in TG
Once the mapping is completed, an alert can simply be set on any desired fuel percentage.
The process is as per this article - Create Alerts on Analogue Values
