Create a Connector - set up an integration

Written by Matthew Clark-Massera
Updated at July 27th, 2024
Table of Contents
In Device Manager, we can create a 'connector'. Then, we Set the Connector on a device, and data from this device will be sent to the endpoint specified in the connector setup.
There are TCP or HTTP options, for full details, see Choosing an Integration Strategy. For integration documents (containing the payload information) - contact your branch's support team.
Some 'advanced' connector setups must still be configured by the DM support team - but the majority can now be easily configured and managed on your own!
Creating a Connector
"Connection Manage" Permission
To create connectors, and see the "Connectors" menu option - your Device Manager user account requires the Connection Manage permission. If you can't access any of the steps/pages shown, contact your account administrator or DM Support.
Create a connector video:
1. Navigate to "Connectors"

2. Create a New Connector
The connector grid will be shown, if you haven't created any connectors yet, it will be empty, otherwise it will show any connectors which you have created.
Down the bottom left of the grid, click New
The connector dialogue appears:
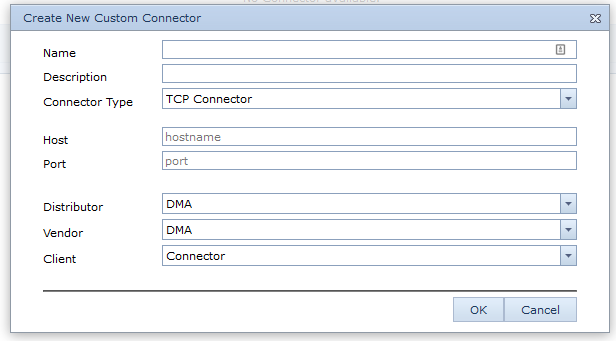
The option selected for Connector Type varies the other fields. We will go through an example of each type.
TCP Connector
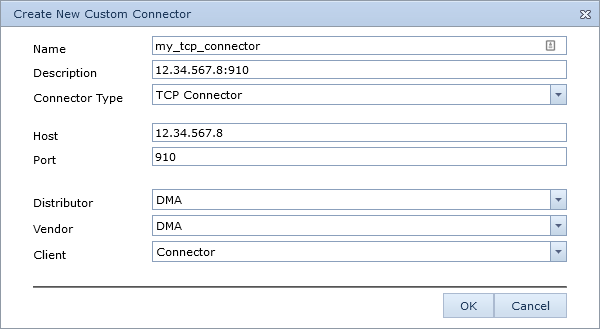
Simply enter a name and your IP:Port, along with the group the connector should appear for.
It is often useful to set the description as the actual endpoint address - for handy reference in the grid of connectors if you have multiple - but you can enter whatever you wish.
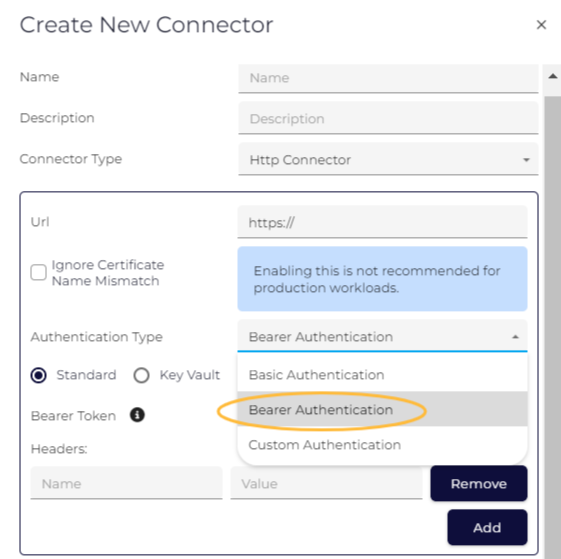
HTTP Connector

There are a few more options for the HTTP connector
- We can use basic authentication
- We can use bearer token authentication
- We can add up to 5 headers that will be sent with the POST
Also check out this article - The HTTP/HTTPS Connector - which shows various dynamic fields we can make use of. For example, if we set the URL to https://myserver.com/[SERIAL] - the serial of the device that is connecting will become part of the URL. This article also explains Bearer Token Authentication.
HTTP Connector with Bearer Token Authentication
In the Authentication Type drop-down, select Bearer Authentication:
Then, select the type of bearer authentication required:
Option 1: Standard
Add your bearer token into the space provided. The standard Bearer Token is stored as an HTTP Header.

Add any additional headers if required as per The HTTP/HTTPS Connector.
Option 2: Key Vault
Select the Key Vault, and click on Retrieve Bearer Token.
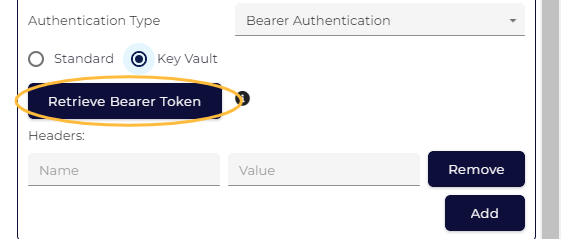
The Key Vault Bearer Token is retrieved from an endpoint using Basic Authentication and will not be visible to the user.
Provide the URL and credentials for the endpoint where the Bearer Token will be requested. The token will not be visible, and if the credentials change, you will need to manually update them.

Add any additional headers if required as per The HTTP/HTTPS Connector.
Multi-Connector
A multi-connector allows us to send data to 2 endpoints at once. We create the two individual connectors first, and then 'join' them in the multi. This is typically used when a partner wants to send data to their own server (they would create their own connector for this) - and Telematics Guru.
To configure, just set the type to MULTI and pick your 2 connectors from the dropdown list.

Location Engine Connector
There are several steps in addition to creating the connector that must be carried out to send Cellular Edge device data to your server - see Send Edge Device Data to my Endpoint (Cellular).
This connector type is specific to our Cellular Edge devices. A Location Engine connector allows us to send the GNSS scan data, Wi-Fi MAC address lists and cell tower scan data to the Location Engine. The Location Engine uses this information to calculate the device location.

- The Forwarder is an HTTP connector which allows the Location Engine to forward the "solved" device data to an end platform.
- The Lookup Settings configure which lookups are done by the Location Engine. Use the General All Lookup as default.
Troubleshooting/FAQ
I'm not getting any data to my endpoint
To debug, go back to the device grid in OEM, and verify the device has connected in recently. If it hasn't, the issue isn't with the connector, either wait for the device to upload, 'force' a connection, or see Troubleshooting - Devices Not Connecting.
If it has, you may see that the Since Connected and Since Committed times don't align - in that case see Since Committed/Since Connected and Troubleshooting. First step is to View Server Logs.
How do I delete a connector?
Click delete in the right hand side of the connector list.