DM Link Wired Provisioning Tool
Table of Contents
Warning!
A new universal DM-Link has been produced and should be used moving forward. The old ULINK2 cable should NOT be used with any newer generation devices! The higher voltage supplied by the ULINK2 can damage the newer devices.
All DM devices require the correct APN to be set so that they can connect on the network. A list of APNs is stored in device FW, and in the majority of cases, the device will detect the network of the SIM card it is using and select the right APN from this list.
On 2G and 3G devices, if the APN is not on the list, the device can be sent an SMS to set the APN. Even if the APN is not yet set, the SMS can still be received and applied.
On 4G Cat-M1 and Nb-IoT, this is not the case. An SMS cannot be received if the device isn't on the network - so configuring APNs and other connectivity settings is not so simple. To assist with this, we have developed a wired tool to enable parameters to be set on the device using a cable and app - and also read some debug information from the device to shed light on why a device may not be connecting.
EU Users
In accordance with the updated European Union Radio Directive (CE-RED) , all internet-connected radio equipment placed on the EU market after 1 August 2025 must comply with enhanced cybersecurity requirements.
For EU users, after an initial connection to Device Manager, the device will not respond to a connection from this provisioning tool in order to comply.
However, once online and connected to Device Manager, parameters and configuration can be managed Over the Air (OTA)
Tool Download
Download the tool HERE.
The tool requires Windows 7 or above. There is no tool available for Mac or Linux.
Device Compatibility
| Devices | ULINK2 | DM-Link |
|---|---|---|
| Bolt | Compatible | Compatible |
| Bolt2 | Compatible | Compatible |
| Dart2 | Compatible | Compatible |
| Dart3-4G and 2G | Compatible | Compatible |
| Dart3-4G-BLE | Compatible | Compatible |
| Dart3-GLOBAL-BLE | NOT Compatible | Compatible |
| Eagle | Compatible | Compatible |
| Falcon | Compatible | Compatible |
| Hawk Pro | Compatible | Compatible |
| Hawk Lite | Compatible | Compatible |
| G120 | Compatible | Compatible |
| G150 | Compatible | Compatible |
| G62 | Compatible | Compatible |
| G62 LoRaWAN |
NOT Compatible |
NOT Compatible |
| G70 | Compatible | Compatible |
| G150 | Compatible | Compatible |
| Oyster2 | Compatible | Compatible |
| Oyster3 Cellular and LoRaWAN | Compatible | Compatible |
| Oyster3 Global and 2G | NOT Compatible | Compatible |
| Oyster Edge | NOT Compatible | Compatible |
| Oyster3 BLE | NOT Compatible | Compatible |
| Remora2 | Compatible | Compatible |
| Remora3-4G | Compatible | Compatible |
| Remora3-Global | NOT Compatible | Compatible |
| Yabby Edge Cellular and LoRaWAN | NOT Compatible | Compatible |
| Yabby 3 | NOT Compatible | Compatible |
| Yabby GPS | Compatible | Compatible |
| Yabby WiFi | Compatible | Compatible |
| Manta Fusion (LTE-M/NB-IoT) | NOT Compatible | Compatible |
| Manta GPS (LTE-M/NB-IoT) | NOT Compatible | Compatible |
| WiFi Beacon | NOT Compatible | Compatible |
| Barra GPS and Barra Edge | Compatible | Compatible |
| Barra Core | NOT Compatible | Compatible |
Cable and Adapter
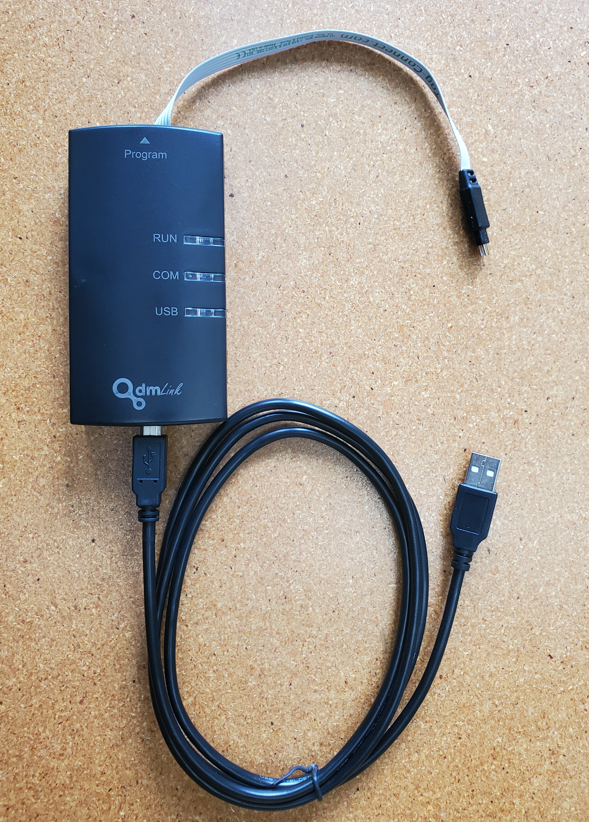
Contact your Digital Matter Branch to purchase a programming cable and adapter. The cable consists of a USB connector (for PC) and JTAG connector (for DM device).
New DM LINK:
Using the tool video
Connecting the Cable to the Device.
The JTAG connector has 9 pins. The 3 longer pins go through through holes in the device PCB, and help hold the cable in place. The other 6 make contact with test pads on the board.
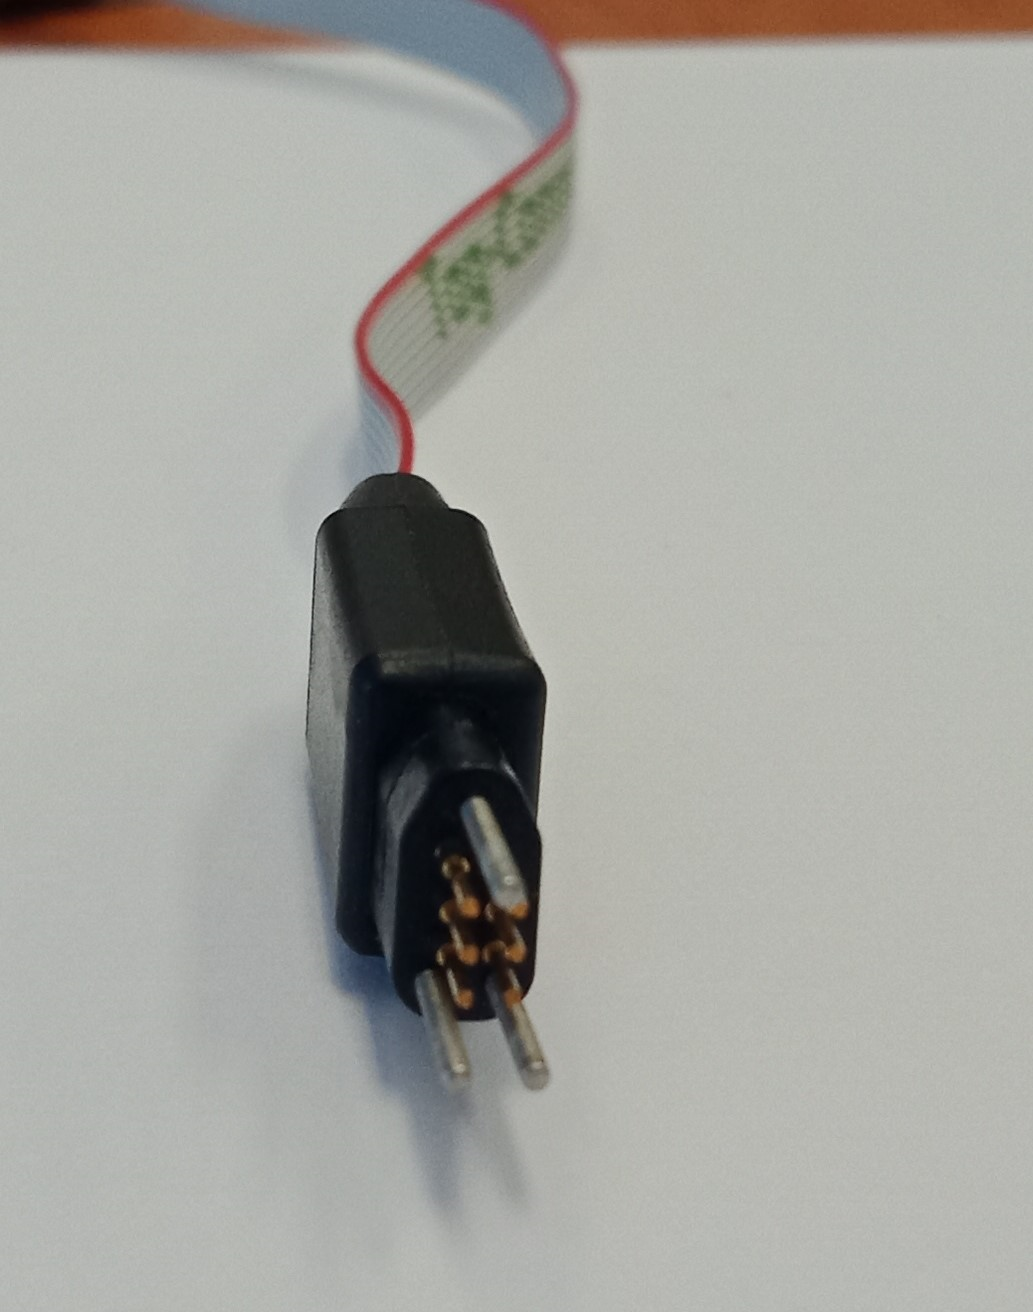
To connect the tag to the PCB, locate the debug port on the device. It is important to use the J2 port - some DM devices have two ports and the J2 port may be hidden underneath the serial sticker.
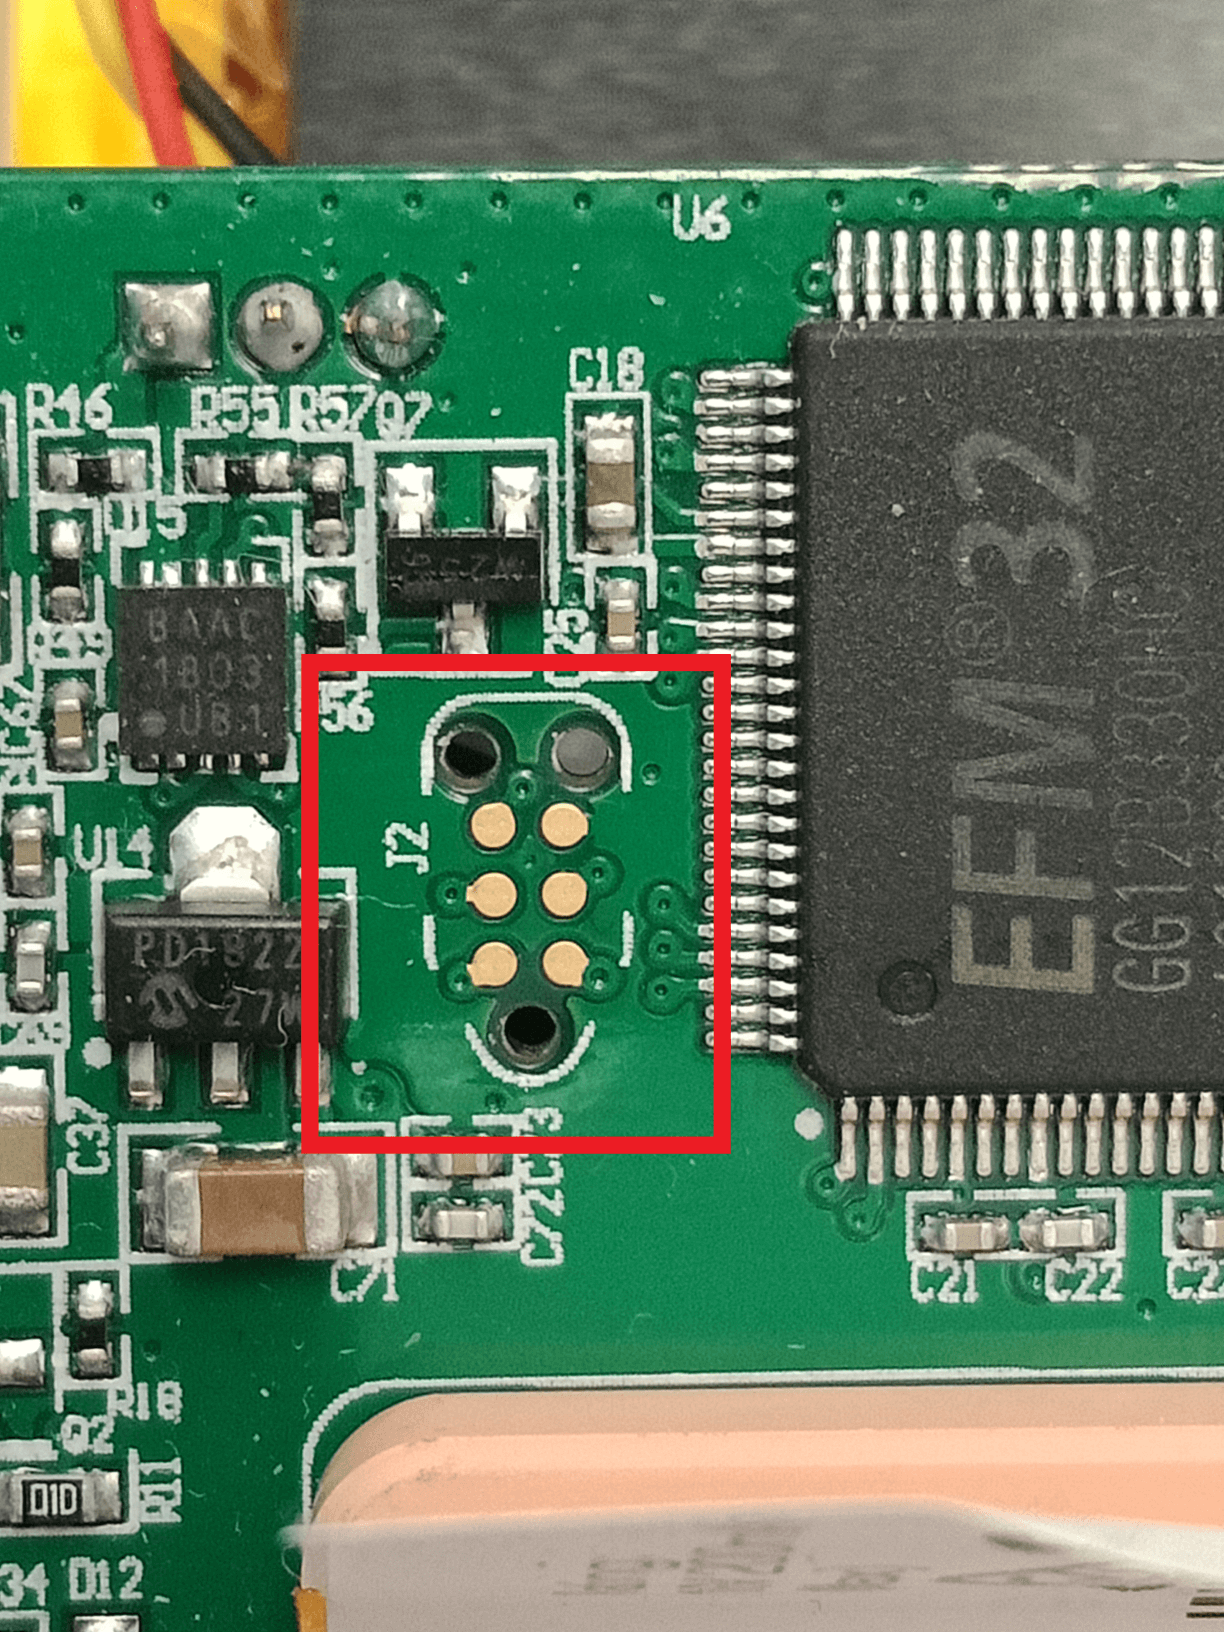
The 6 gold pads correspond to the 6 short pins on the cable, and the 3 holes the 3 long pins.
NB - some devices have more than 1 debug port (i.e. some have an additional port for the BLE Module). If the tool is not running, try the other port. Don't push too hard, or you may damage the spring-loaded pins, or puncture the backup battery on those devices that keep the battery underneath the circuit board.
Reboot your device after using the tool
When using the tool:
- The device must be powered on
- After use, disconnect all cables and power cycle the device to continue normal operation.
Tool Features
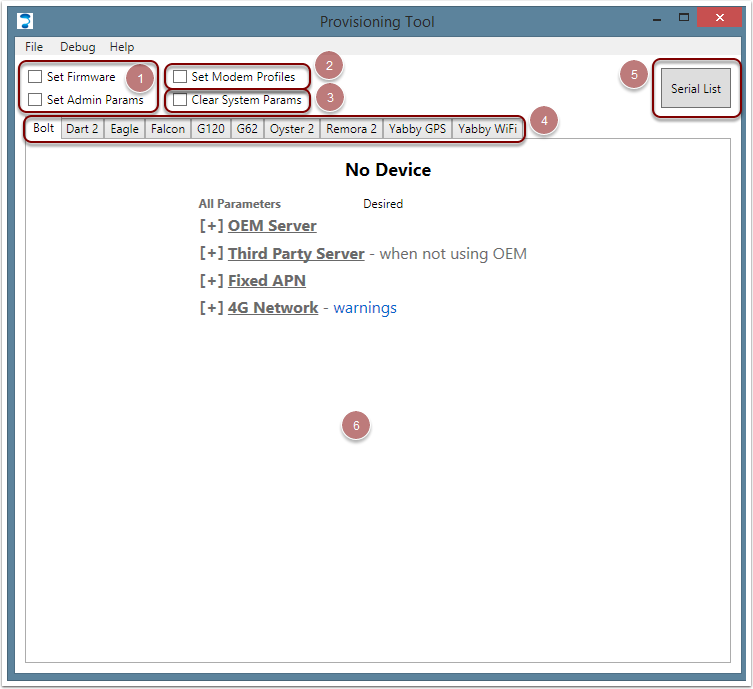
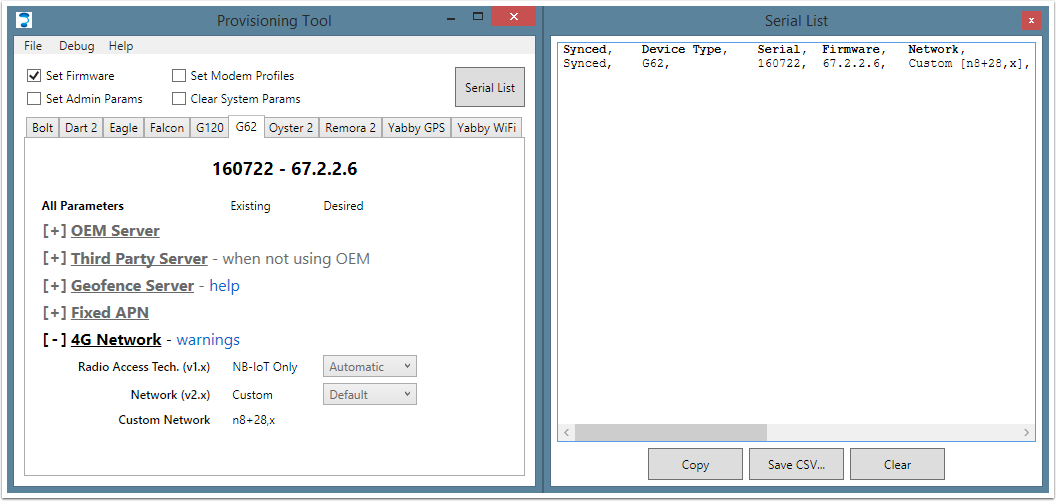
- Tick these options to set the firmware on the device, and apply the parameters that are set below (6).
- This checkbox updates the modem's internal profiles to support DNS on some NB-IoT networks (see here).
- This clears any system parameters that might have been set through OEM server.
- Each supported device has a separate Admin Parameters tab.
- Opens the serial list. A list of devices read by the tool and the result of the read/writes are shown here.
- Admin Parameters for each device. Expand the accordion to see further detail.
Programming Firmware
The Programming Tool comes loaded with FW for each device, and updates the firmware automatically before setting the Admin Parameters. The bundled firmware may not be the latest firmware, so using the tool will sometimes result in a firmware downgrade.
Setting the firmware and Admin Parameters can be a useful debugging tool. If incorrect settings were previously applied, a device should be able to reconnect after this. If it is doesn't there is likely a hardware fault.
To program the FW:
- Open the tool
- Tick the Program Firmware checkbox
- Power on the device
- Plug the adapter cable into the device and hold until the screen flashes
Result:
The screen should flash blue, and the device's serial number, hardware revision, and FW revision should be shown. If the firmware needs to be updated, a progress bar will pop up during the update.
Programming Parameters
- For parameters, the process is the same.
- Simply enter your desired parameters, check the Set Parameters checkbox, power on device and hold in cable.
- Note that you can't edit the parameters while the Set Parameters checkbox is checked.
- In the Serial List dialog, a device will show as Synced once its parameters match the desired parameters.
Accessing Debug Logs from Device
- To increase the detail of future debug logs, go to Debug -> Enable Debug Logs in the menu.
- To read all existing logs, go to Debug -> Read Debug Logs in the menu.
- The debug window will open. Then you can hold the cable into the device.
- A status bar will appear showing the progress of the debug download. The cable cannot be disconnected during this time.
- This may take 1-2 minutes per device, as all available device history is read (even previously uploaded history).
- This is not the fastest process, but may help to determine why a device isn't connecting when the online debug logs are unavailable
- There is a Save CSV option on the dialogue which appears with the logs. Use this to save a copy of the logs to send to our support team for further debugging.
Or watch our how-to video
Setting the Modem Profiles
As described in this article, the modem's internal network profiles may need to be updated to add support for DNS on certain NB-IoT networks. Checking the Set Modem Profiles checkbox before inserting the adapter cable will cause the tool to power up the device's modem and update the profiles if required. This adds a few seconds to the programming cycle, during which a dialogue box displays the progress.
You can take advantage of this to check the modem function when debugging devices that are suspected faulty. If the modem is not responding, an error message will be displayed during the modem profile check. If the device has a stable power supply, and the modem is not currently attempting to update its firmware, an error message during the profile check is a good indicator of faulty hardware.
If the modem is busy trying to update its firmware, the profile update cannot be run. You can restart the device and leave it on power for 30 minutes to allow the firmware update to complete.
Sending AT commands to the modem
The provisioning tool also allows a command line to be opened - and AT commands sent directly to the modem.
To access - simply hit Ctrl + Alt + M with the provisioning tool open.
There is a Transfer File option at the top of the window which opens.
