Magnetic Activation Mode and Tamper Detect on the Barra

Written by Matthew Clark-Massera
Updated at March 8th, 2024
Table of Contents
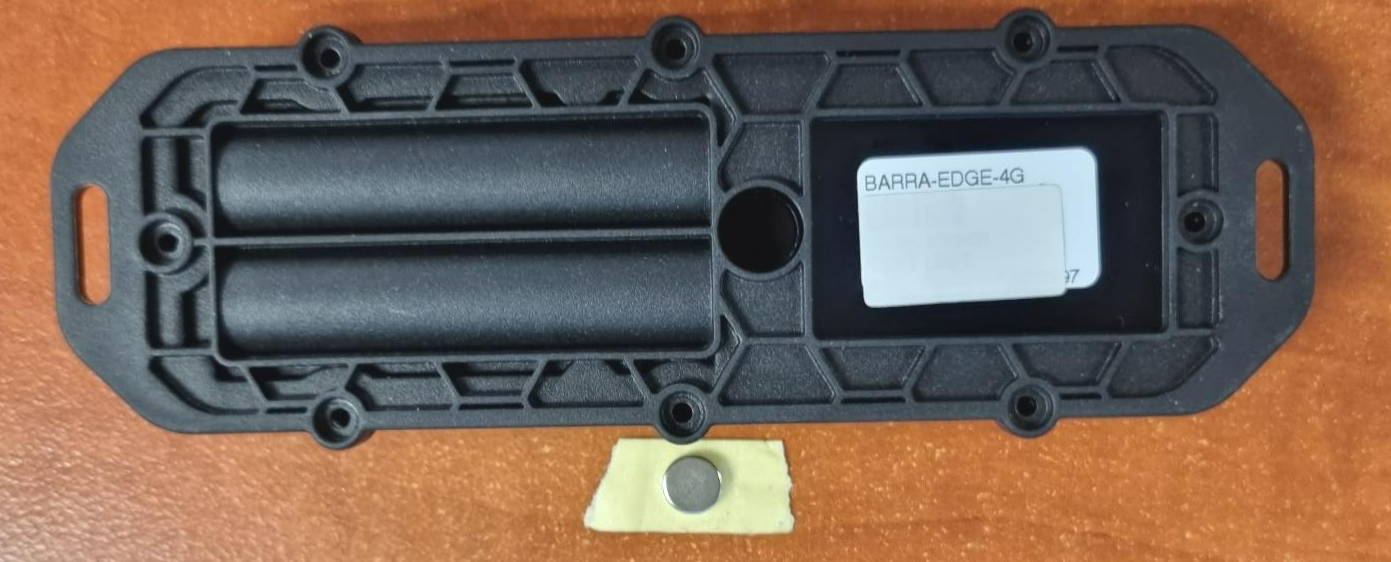
The Barra Range of devices features a Hall Effect Sensor, and includes a magnet.
A Hall Effect sensor can detect the presence of a magnetic field. So the device can detect whether the small magnet shown below is within the housing recess or not.
This enables 2 key features/modes - Activation Mode and Tamper Detection
-
Activation Mode
- While the magnet is present, the device remains in a super-low power ‘dormant’ state - and is effectively shut off.
- The device will not attempt to obtain a location fix, or upload.
- This allows devices to be provisioned (SIM inserted, batteries inserted, device sealed) and shipped to users in this state
- When the user wants to install the device, they can simply remove the magnet and it will begin operation!
- If the magnet is reinserted, the unit will again deactivate.
-
Tamper Detection
- When installing the device, the magnet can be glued or otherwise attached to the asset.
- The Barra is then installed over the magnet (the magnet fits inside the housing recess).
- If the Barra is removed from the asset - the Barra will immediately detect that the magnet is no longer present, and send an alert.
Configuration
The Barra ships in Activation Mode as standard, meaning…
- The magnet must be removed when installing in order for the device to connect
- If the magnet ever gets reinserted, it will go dormant again
The parameters can be edited to set the ‘Sensor Function’ to the following:
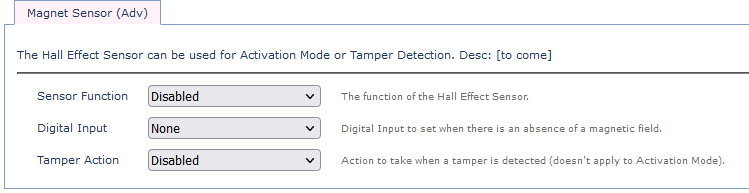
- None (disable the Hall Effect Sensor) - This saves a small amount of energy and is worthwhile if once deployed you are not making use of Tamper Detection
- Tamper Detection
- Activation Mode
The specific timing of applying parameters, or a parameter template should be considered, particularly when the device is in Activation Mode, with the magnet inserted. New parameters can then be applied which will only take effect once the magnet is removed and checks in.
System Parameters
The ‘Sensor Function’ dropdown can be found in the ‘Magnet Sensor’ tab; which can be accessed by adding ‘Advanced Parameters’ in the ‘Edit System Parameters’ menu.
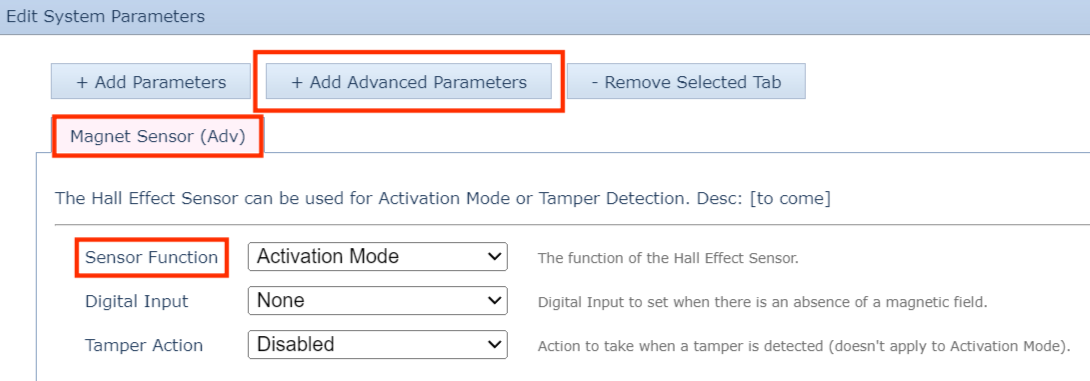
Activation Mode (Default)
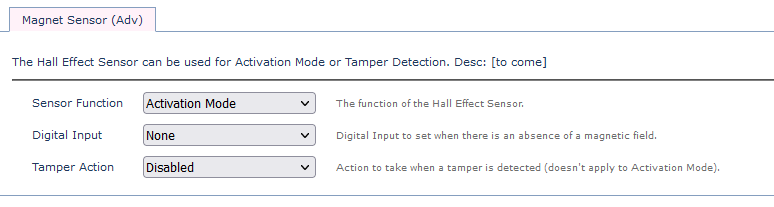
- Magnet present = device is dormant and offline
- Magnet removed = device will operate
Disable Magnet Sensor
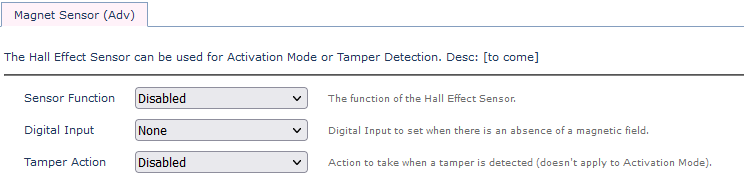
Turn the Hall Effect Sensor off, if it is unused, to save energy.
This also has the benefit of preventing the device from being inadvertently disabled after deployment if the magnet is reinserted.
Tamper Detect
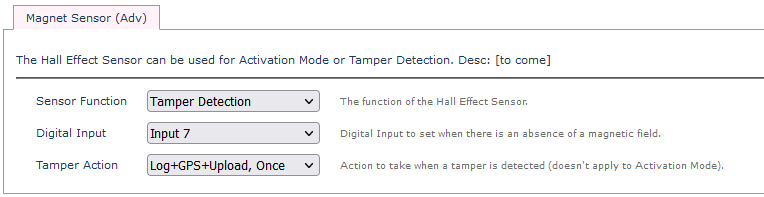
- Tamper Detection can be enabled
- Select a digital input to be set when the magnet is not present
- Set the action (i.e. upload to alert on the server)
Admin Parameters
The ‘Allow Activation Mode’ dropdown can be found in the ‘Magnetic Sensor Override’ tab which can be accessed by adding parameters’ in the ‘Edit Admin Parameters’ menu.
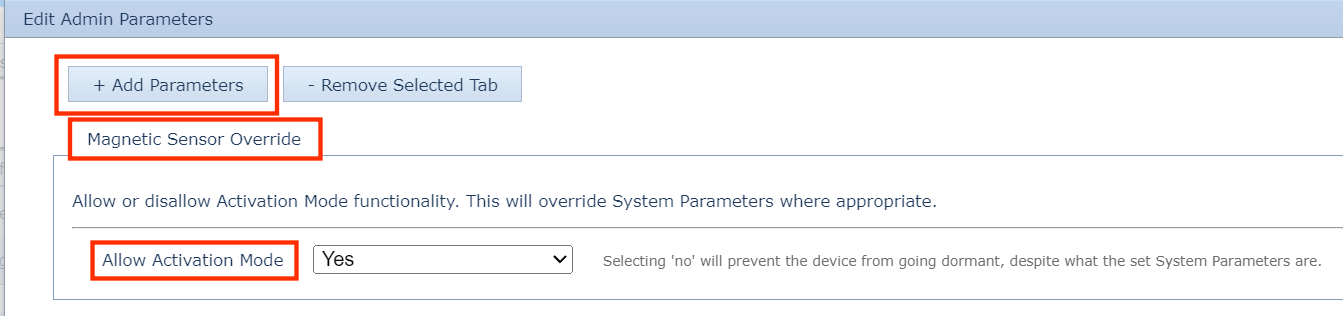
Setting ‘Allow Activation Mode’ to No will prevent the device from going dormant (offline), irrespective of what system parameters are set.
This allows for a failsafe mechanism, as simply applying the wrong system parameter template cannot cause a device to go dormant.
|
Magnetic Sensor Override (Admin Parameters) |
Sensor Function (System Parameters) |
Outcome |
YES |
Activation Mode | Activation Mode is active |
NO |
Activation Mode | Nothing is active |
YES |
Tamper Detection | Tamper Detection is active |
NO |
Tamper Detection | Tamper Detection is active |
YES |
Disabled | Nothing is active |
Tamper Detection Payload and Alert Example
For the Tamper Detection setup below, Digital Input 7 will be set to ‘1’ when the magnet is not present.
In addition, Bit 6 of the Device Status Field is set.
Barra Edge Payload Example
{
"date": "2022-11-02T07:12:49Z",
"device": {
"sn": "415828",
"prod": 85,
"rev": 1,
"fw": "1.21",
"iccid": "89610185002696330407",
"imei": "351358810440518"
},
"sqn": 8617,
"reason": 3,
"lat": -31.9476768,
"lng": 115.8195775,
"posAcc": 13,
"posInfo": {
"Src": 6
},
"analogues": [
{
"id": 1,
"val": 4324
},
{
"id": 3,
"val": 2600
},
{
"id": 4,
"val": 18
},
{
"id": 5,
"val": 4289
}
],
"inputs": 129,
"outputs": 0,
"status": 67,
The “inputs” and “status” field is what we are interested in.
- “inputs”: 129
- 129 (dec) = 1000 0001
- Digital Inputs 0 and 7 are active (meaning tamper is active)
The same applies for “status” - we are looking for bit 6 being active.
This can be used to drive alerts in the end software platform.
Tamper Alert in Telematics Guru
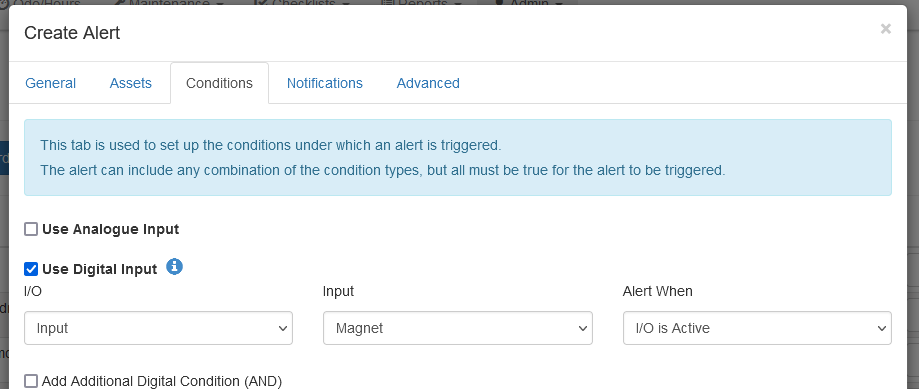
The ‘Magnet’ Status Flag is mapped to Digital Input 30 in Telematics Guru by default.

Configure an alert on this digital input in order to set up a tamper alert.
Provisioning Workflow Examples
Parameters applied while the device is dormant (magnet present in Activation mode) will queued and applied when the device first connects in (i.e. magnet removed for deployment).
Test the device during provisioning; prevent accidental deactivation in field
We may want to:
- Test the device (check it connects in and gets a location update) while inserting SIM cards and batteries
- Deactivate the device, and ship to the end user
- Let the user remove the magnet and secure the Barra onto the asset
- Prevent the device from being deactivated again
Workflow is..
- Remove the Magnet
- Insert the SIM and Batteries. Follow the usual provisioning steps
- Reinsert the Magnet
- Apply an Admin Parameter template to set “Allow Activation Mode” to NO.
- Apply a System parameter template disabling the magnet
- Remove the magnet and install the device
- The device will wake, apply the queued parameters - and then the magnet sensor is disabled to save energy and prevent accidental deactivation if the magnet is reinserted.
Provisioning at time of install - no tamper
If we simply want to insert the batteries + SIMs, then immediately install the device on the asset, with no need for tamper alerts:
- Apply an Admin Parameter template to set “Allow Activation Mode” to NO
- Configure Sensor Function for “Disabled” under System Params.
- Remove the magnet from the device, discard.
- Insert SIM + Batteries (see getting started guide for the usual provisioning steps)
- Install the device on the asset.
This process means that after step (3) - the Magnet Sensor is deactivated to save energy, and also to prevent the device from being accidentally deactivated if the magnet is reinserted.
Ship units with SIMs + Batteries - use magnet for tamper in the field
- Test Unit while assembling
- Remove Magnet
- Insert SIM + Batteries and follow the usual provisioning steps
- Reinsert Magnet
- Apply an Admin Parameter template to set “Allow Activation Mode” to NO
- Apply a System parameter template, setting the Magnet Function to Tamper
- Ship device to end user
- Installation:
- Remove the magnet, and confirm that the device has checked in via the Installer Page (this ensures that the device has left ‘Activation Mode’ and has entered 'Tamper' Mode')
- Glue Magnet to asset
- Mount the device on to asset, covering the magnet