Battery Level Monitoring
Table of Contents
Digital Matter battery powered devices have in-built battery monitoring capabilities. It is critical to any application that:
- The batteries last long enough so that frequent changes are not necessary
- Low battery alerts are sent in a timely manner - so that battery changes can be made before batteries run flat.
See Battery Recommendations for details on selecting the right batteries.
The differences in battery chemistry mean the battery monitoring approach is slightly different for each type.
However, the firmware takes care of all of this for us, across all DM device types, and simply sets flags in the payload which we can alert on.
Setting up Low Battery Alerts
Information about editing parameters is available → Device Manager - Getting Started
The Battery Voltage Parameters are already configured by default - so we don't need to go make any changes, or configure anything unless we have special requirements.
Battery Good + Battery Critical Flags
Barra Edge, Barra Core and Barra GPS
The Barra range supports Lithium Iron Disulphide (Recommended) and Alkaline batteries. 
The device keeps two battery 'flags'
The Battery Good Digital Input is mapped to Digital Input 1 by default. This is the same 'Battery Good Flag' sent in the status flags. This is active '1' when the voltage is above the Battery Low Threshold, and inactive '0' when below this threshold. So, for the above defaults, it is inactive when the battery voltage drops below 3.1V.
NOTE: Make sure to set the appropriate Battery Low threshold value. Here are the suggested values for the different Barra models and battery types.
| Device Type | Lithium | Alkaline |
|---|---|---|
| Barra Core | 3.233V (3233 mV) | 2.8V (2800 mV) |
| Barra Edge | 3.0V (3000 mV) | 3.0V (3000 mV) |
| Barra GPS | 3.2V (3200 mV) | 2.6V (2600 mV) |
The Battery Critical Digital Input is mapped to Digital Input 2 by default.
This input is turned on - 'set to 1' if a brownout occurs. On the Barra Edge - this is if the voltage ever dips below 2V - which is too low to properly power the device. If this occurs - it is because the batteries are on their last legs, and need to be replaced immediately! The device needs at least 2V to operate.
The above flags mean we have 3 distinct states
| Battery Good Digital Input (DI 1) | Battery Critical Digital Input (DI 2) | Meaning |
| 1 = On | 0=Off | Battery is OK, no action needs to be taken |
| 0 = Off (cleared) | 0 = Off | The battery is running low, and preparations should be made to replace batteries soon |
| 0 = Off (cleared) | 1 = On | The battery needs replacing ASAP |
Yabby Edge and Yabby3
The Yabby Edge and Yabby3 support Lithium Iron Disulphide (Recommended) and Alkaline batteries. 
The devices keep two battery 'flags'.
The Battery Good Digital Input is mapped to Digital Input 1 by default. This is the same 'Battery Good Flag' sent in the status flags. This is active '1' when the voltage is above the Battery Low Threshold - an inactive '0' when below this threshold. So for the above defaults, it is inactive when the battery voltage drops below 4.65V.
NOTE: The threshold of 4.65V has been chosen based upon testing with 3 x Energizer Ultimate Lithium Batteries. This should be set to 3600mV (3.60V) if you are using alkaline batteries.
The Battery Critical Digital Input is mapped to Digital Input 2 by default.
This input is turned on - 'set to 1' if a brownout occurs. On the Yabby Edge and Yabby3 - this is if the voltage ever dips below 3V - which is too low to properly power the device. If this occurs - it is because the batteries are on their last legs, and need to be replaced immediately! The device needs at least 3V to operate.
The above flags mean we have 3 distinct states
| Battery Good Digital Input (DI 1) | Battery Critical Digital Input (DI 2) | Meaning |
| 1 = On | 0=Off | Battery is OK, no action needs to be taken |
| 0 = Off (cleared) | 0 = Off | The battery is running low, and preparations should be made to replace batteries soon |
| 0 = Off (cleared) | 1 = On | The battery needs replacing ASAP |
Oyster Edge, Oyster3 Bluetooth and Oyster3 2G
The Oyster Edge and Oyster3 Bluetooth support Lithium Iron Disulphide (Recommended) and Alkaline batteries. 
The device keeps two battery 'flags':
Battery Good Digital Input
- Mapped to Digital Input 1 by default.
- Also appears as Bit 1 in the Device Status Flags
- Active '1' when the voltage is above the Battery Low Threshold - and inactive '0' when below this threshold.
Battery Low Threshold
If Battery Chemistry is set to AutoDetect and the Battery Low Threshold parameter set to 0, on startup, the device records the initial battery voltage, and works out if LiFeS2 or Alkaline batteries have been inserted.
Then, the battery low thresholds for each battery chemistry are as follows:
- LiFeS2 - 4.85V
- Alkaline - 3.6V
For LiFeS2 and Alkaline, the battery voltage (Analogue 1), and voltage used in the threshold is reported as the maximum voltage seen over a 3 day period. This is because battery voltages do bounce around somewhat and this provides some averaging. Additionally, the different chemistries have different discharge profiles which require different measurement methods.
We can adjust the thresholds if desired by changing the Battery Chemistry dropdown and setting a value in mV for the Battery Low Threshold. This is typically not required, only change if you know what you are doing.
Battery Critical Digital Input
- Mapped to Digital Input 2 by default
- Also appears as Bit 5 in the Device Status Flags
- Active '1' if a brownout occurs.
- If the voltage ever dips below 3V - which is too low to properly power the device. If this occurs - it is because the batteries are on their last legs, and need to be replaced immediately! The device needs at least 3V to operate.
The above flags mean we have 3 distinct states
| Battery Good (DI 1 + Status Bit 1) | Battery Critical (DI 2 + Status Bit 5) | Meaning |
| 1 = On | 0 = Off | Battery is OK, no action needs to be taken |
| 0 = Off (cleared) | 0 = Off | The battery is running low, and preparations should be made to replace batteries soon |
| 0 = Off (cleared) | 1 = On | The battery needs replacing ASAP |
Oyster3 and Oyster3 Global
The Oyster3 supports Lithium Iron Disulphide (Recommended), Lithium Thionyl Chloride (LTC) and Alkaline (not recommended) batteries.
The device keeps two battery 'flags':
Battery Good Digital Input
- Mapped to Digital Input 1 by default.
- Also appears as Bit 1 in the Device Status Flags
- Active '1' when the voltage is above the Battery Low Threshold - and inactive '0' when below this threshold.
Battery Low Threshold
If Battery Chemistry is set to AutoDetect and the Battery Low Threshold parameter set to 0, on startup, the device records the initial battery voltage, and works out if LTC, LiFeS2 or Alkaline batteries have been inserted.
Then, the battery low thresholds for each battery chemistry are as follows:
- LTC - 7V loaded voltage (analogue 5)
- LiFeS2 - 4.85V
- Alkaline - 3.6V
The battery voltage reported in Analogue 1, is reported as the maximum voltage seen over a 3 day period.
This is because battery voltages do bounce around somewhat and this provides some averaging. Additionally the different chemistries have different discharge profiles which require different measurement methods.
We can adjust the thresholds if desired by changing the Battery Chemistry dropdown and setting a value in mV for the Battery Low Threshold. This is typically not required, only change if you know what you are doing.
Battery Critical Digital Input
- Mapped to Digital Input 2 by default
- Also appears as Bit 5 in the Device Status Flags
- Active '1' if a brownout occurs.
- On the Oyster3 - this is if the voltage ever dips below 3V - which is too low to properly power the device. If this occurs - it is because the batteries are on their last legs, and need to be replaced immediately! The device needs at least 3V to operate.
The above flags mean we have 3 distinct states
| Battery Good (DI 1 + Status Bit 1) | Battery Critical (DI 2 + Status Bit 5) | Meaning |
| 1 = On | 0 = Off | Battery is OK, no action needs to be taken |
| 0 = Off (cleared) | 0 = Off | The battery is running low, and preparations should be made to replace batteries soon |
| 0 = Off (cleared) | 1 = On | The battery needs replacing ASAP |
Remora3 and Remora3 Global
The Remora3 series supports Lithium Thionyl Chloride (LTC) batteries only.
The Battery Meter - Coulomb Counter:
The Remora3 Global does not have a coulomb counter; however, the Remora3 4G is equipped with a battery meter (coulomb counter) that tracks the energy (mAh) used by the battery.
A coulomb counter is a device which measures the total amount of charge flowing out of the battery*. This can be used to estimate the battery percentage, and remaining battery life.
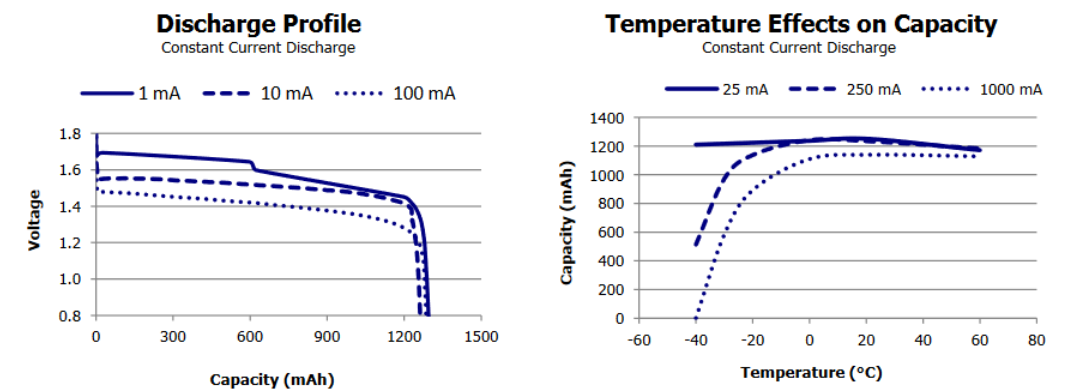
This is can provide more information than voltage alone. Considering the discharge profile graph below, for the first 600mAh per cell of capacity used, the voltage changes minimally. So we can't make accurate capacity estimates when we only have voltage to go off. However the battery meter would be able to detect this and therefore tell what percentage has been utilized - i.e. 600mAh/1200mAh = 50%.
Despite the excellent battery capacity estimates the battery meter provides, these estimates still rely on an assumption of the total capacity of the batteries. This can vary per battery type, and even on a single type quite significantly due to temperature variations. So the estimates aren't infallible. 14Ah capacity of the 2 x D Cell LTC batteries is assumed.
*The percentage resets on whenever the batteries are replaced or on a power reset (same batteries taken out and placed back in) as it assumes a battery change has occurred
Example: Below is the discharge profile of Energizer Ultimate Lithium L92 (AA) batteries.
[Source: Energizer]
Other battery types, and adjusting the capacity assumptions
The assumptions for battery mAh and capacity can be changed under this parameter tab in System Parameters if required.

In general, these should remain unchanged (do not touch these parameters unless you know what you are doing). However, if you are finding you are regularly getting greater/less capacity from your batteries, or you are using a different type of batteries with a different total capacity - they can be adjusted.

The device keeps two battery 'flags':
Battery Good Digital Input
- Mapped to Digital Input 1 by default.
- Also appears as Bit 1 in the Device Status Flags
- Active '1' when the percentage is above the Battery Low Percentage - and inactive '0' when below this threshold (default is 15%).
- If a brownout occurs this is set to '0' - whatever the percentage.
Battery Critical Digital Input
- Mapped to Digital Input 2 by default
- Also appears as Bit 5 in the Device Status Flags
- Active '1' if a brownout occurs.
- On the Remora3 - this is if the voltage ever dips below 3.3V/cell LTC - which is too low to properly power the device. If this occurs - it is because the batteries are on their last legs, and need to be replaced immediately! The device needs at least 3.3V to operate.
The above flags mean we have 3 distinct states
| Battery Good (DI 1 + Status Bit 1) | Battery Critical (DI 2 + Status Bit 5) | Meaning |
| 1 = On | 0 = Off | Battery is OK, no action needs to be taken |
| 0 = Off (cleared) | 0 = Off | The battery is running low, and preparations should be made to replace batteries soon |
| 0 = Off (cleared) | 1 = On | The battery needs replacing ASAP |
Battery Passivation
Lithium Iron Disulphide batteries are popular because they are long-lasting and work well in tough conditions. However, they can develop a passivation layer—a thin film of lithium chloride on the anode during storage. This layer helps preserve the battery but can temporarily raise internal resistance when the battery is first used.
When a passivated battery is first used, its high internal resistance can cause a temporary voltage drop, especially during startup or high power use. If the device has brownout protection, it might see this drop as a power failure and mark the battery status as critical.
Digital Matter devices feature brownout detection, so the above can and does at times occur!
These brownout warnings are often false alarms caused by the temporary effects of passivation. After the battery starts supplying current, the passivation layer breaks down, internal resistance drops, and the battery works normally.
So, a 'critical battery' alert right after installation doesn’t mean the battery is bad—it’s usually just adjusting and still has full capacity.
The simplest way to reset the battery critical flag is to power cycle your device by removing the batteries, waiting 15 - 30 seconds, and reinserting the batteries.
If you don't have it in your hands, this can be done over the air - learn more here
Battery Alerts and Reports
Alerts in 3rd Party Platforms
We simply can configure the system to alert based on the status on Digital Inputs 1 and 2. Or the Status Flags.
It may be desirable to use the Status Flags as they are fixed across devices and cannot be remapped via parameter changes like the Digital Inputs Can.
- If Digital Input 1 / Status Bit 1 is cleared (1 -> 0) - send a Battery Low Alert
- If Digital Input 2 / Status Bit 5 is set (0 -> 1) - send a Battery CRITICAL Alert.
In some cases, when batteries are replaced, the flags may not clear. This usually happens when the batteries are changed too quickly. In this scenario, there is still some residual charge in the device, preventing it from fully shutting down and resetting. As a result, the battery status flags do not reset.
Alerts/ Battery Level Report in Telematics Guru
Low Battery Alert
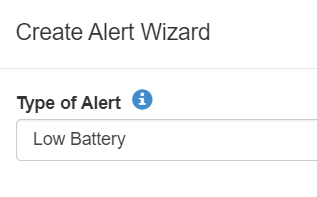
Create an Alert via Admin -> Alerts and use the Wizard.

Select the Low Battery alert and follow the prompts to set up this alert. This creates an alert on the Battery Good DI automatically.

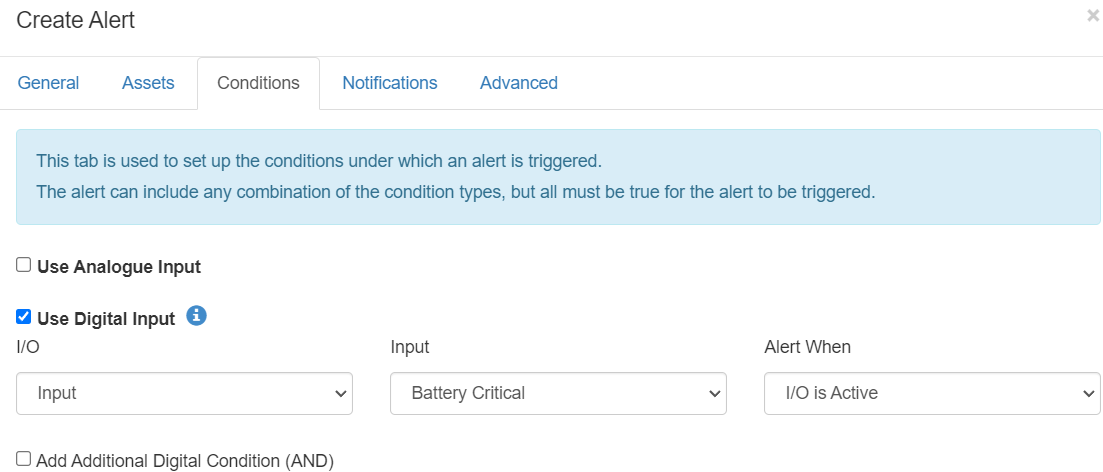
Battery Critical Alert
Create an Alert via Admin -> Alerts and select New Alert (Advanced). When setting up the alert, set the following conditions on the Conditions tab (an alert when Digital Input is active)

Partner Battery Level Status Report
The Partner Battery Level Status report can be run to give an overview of the current battery status of all assets across a partner. It can be limited to an organization or device type additionally.
See the link Partner Battery Level Status Report for more information.
Battery Monitoring in Device Manager
Device Manager Battery Report
A battery low/critical report can be exported via Device Manager. This report details devices that have had the battery good flag unset and details if in a low or critical state. See Device Manager Battery Low/Critical CSV Export for more information.

In some cases, when batteries are replaced, the flags may not clear. This usually happens when the batteries are changed too quickly. In this scenario, there is still some residual charge in the device, preventing it from fully shutting down and resetting. As a result, the battery status flags do not reset.
