Initial Provisioning- Remora3

Written by Matthew Clark-Massera
Updated at September 4th, 2024
Table of Contents
This guide is intended to assist new users in getting the Remora3 online for the first time. Once you have some experience with the device, this process may change slightly.
E.g. you may wish to queue firmware and parameter updates before inserting a SIM and batteries - so that the device picks up new settings once it gets online.
1. In the Box
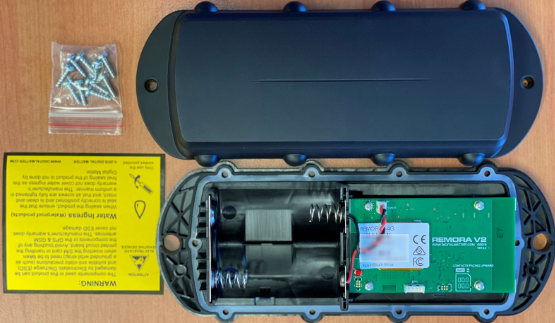
The box contains the Remora3, sealed in a plastic bag and a small seal bag containing 10 x 3.5mm x 12mm Pozi pan head screws. The image below shows a Remora3 Cellular (LTE-M/NB-IoT).
2. Provisioning Process
Electrostatic Discharge (ESD) Warning
The components used in the Remora3 can be damaged by Electrostatic Discharge (ESD). Suitable anti-static precautions (such as a grounded wrist strap) need to be taken when inserting the SIM card or handling the printed circuit board. Avoid touching any of the components or the GPS & GSM antennas. The manufacturer's warranty does not cover ESD damage.
1.Provision the device on Tracking Platform
While this is not specifically required to 'fire up' a device, it is generally helpful to do this step first as it will mean if all goes according to plan, we'll simply see our device appear online in this platform.
Telematics Guru users can follow the guide here Creating Assets in Telematics Guru.
2.Insert SIM Card
The Remora3 uses a Nano 4FF SIM Card. The Remora3 Cellular (LTE-M/NB-IoT) device can operate on LTE-M or NB-IoT networks, whereas the Remora3-Global can operate on Cat1-bis or 2G networks. As such, the specific device type will require a specific SIM card for the intended network.
Which SIM card to use?
For information on selecting a SIM card for LTE-M/NB-IoT networks in particular, see SIM Providers: LTE-M/Nb-IoT + Roaming, and Setup.
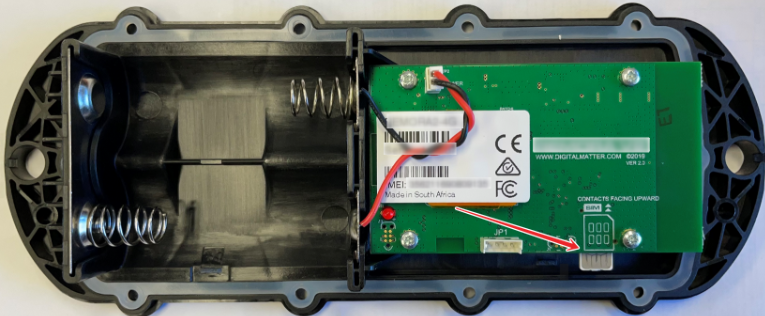
The sim holder is located on the bottom side of the PCB. Make sure the keyed corner of the sim card aligns to the SIM orientation marked on top of the PCB. The image below shows a Remora3 Cellular (LTE-M/NB-IoT).
3. Insert Batteries
The Remora3 uses 2 x D Cell (3.7V per cell) Lithium Thionyl Chloride Batteries (LTC).
Key Requirements:
- 5-16V DC Input Voltage Range
- Only LTC batteries should be used.
For more information on Remora3 batteries, visit Battery Recommendations
4. Getting Online
Once the batteries are inserted, the internal LED will come on and flash. The device will do the following:
- Connect to the server: If the SIM card works the device will connect to the OEM Server and attempt to download any firmware and parameter updates then fetch fresh GPS aiding data.
- Get a GPS Fix: The device will attempt to get a GPS fix. You can speed this up by moving to an area with good GPS signal.
- Reconnect to the server: The device will attempt to connect again to upload the result of the GPS Fix.
If the device does not complete these steps in 10 minutes, it will go to sleep and try again on the next heartbeat or the next trip start.
We are online!
Once these steps are completed, if all has gone to plan, we will be able to see the device on the map on our tracking platform.
The OEM Installer Page
Some users/installers may not have access to our end tracking platform, so the OEM Installer page can be used. It allows for a quick device check without giving away any sensitive information. It's also a handy tool for those with OEM/TG access
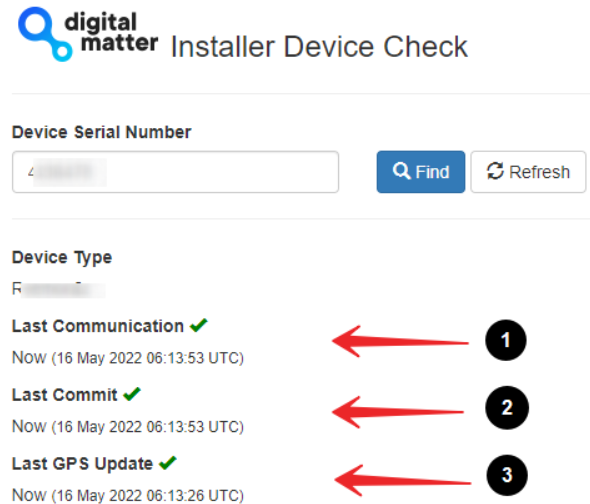
Go to www.oemserver.com/installer and search for the serial number to confirm that it has
- Connected
- Committed
- Got a GPS Fix
4. Troubleshooting
In the rare events the device does not connect, commit or get a GPS fix. Troubleshooting steps are detailed below.
Device does not connect
- Check the LED is flashing, if the LED is not flashing, either:
- The batteries inserted are dead. Test with a battery tester to check, or try a fresh set
- The device may have an issue, in which case contact DM for RMA information
- The device has not properly reset. Remove batteries for 20 seconds, and reinsert.
- Confirm your SIM card is active
- It is worth trying a SIM card from another connected DM device if possible (as that SIM is proven working)
- Try a fresh set of batteries (they may have enough power to flash the LED but not enough to upload data)
- If it is your first time using a new type of SIM or network, you may need to apply certain network settings with a DMLink Cable.
Device does not Commit
Typically, this is due to the device not yet being configured on the end server. Make sure this has been done.
See Since Committed/Since Connected and Troubleshooting for troubleshooting steps.
Device does not get a GPS Fix
If after leaving the device for 5-10 minutes to attempt to get a GPS fix (the very first one can take a short while)
- Take the device outdoors, with a clear view of the sky.
- Remove batteries for 20 seconds, and reinsert. This restarts the device and it will immediately attempt to get a fix. Since you have moved locations now, the device should get better GPS signal and should get a fix
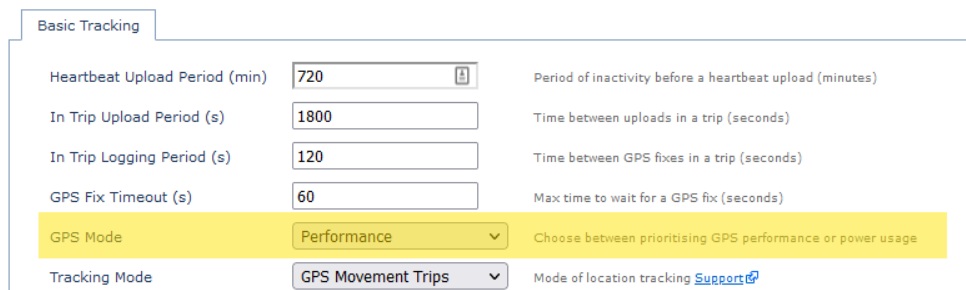
- Ensure the GPS is set to "Performance Mode" in System Parameters. This is only applicable to the Remora3 Cellular (LTE-M/NB-IoT). The Remora3-Global does not have this setting.
- Failing this, the device may have an issue with the GPS. See GPS Troubleshooting, or contact DM Support.