Setup devices on The Things Network (v3)
Table of Contents
The Things Network is a global, community driven LoRaWAN network, that is free to use and has a great web interface. It is ideal for trialing our LoRaWAN devices, using either your own gateways, or community gateways in your area. Every gateway connected to TTN routes traffic from both your own devices and public devices, so the network coverage can be expected to expand rapidly as IoT projects begin rolling out. TTN supports all 800 and 900 MHz regions.
This guide covers getting devices set up on TTN v3 - which is a LoRaWAN Network Server. From there, it needs to be forwarded onto
1. Sign up for a TTN account
Browse to The Things Network registration page. Follow the prompts, and complete the email verification step.
2. Open the TTN console
The console is where you configure you gateway, create an application, register your devices, and set up forwarding to application servers. It is usually accessed at different URLs based on region:
| Region | URL |
| Europe 1 | https://eu1.cloud.thethings.network/console |
| North America 1 | https://nam1.cloud.thethings.network/console |
| Australia 1 | https://au1.cloud.thethings.network/console |
3. Add your gateway
Browse to the Gateways screen in the console, and click 'add gateway'. Most gateways will be using the Semtech packet forwarder protocol, which forwards packets on UDP port 1700. If your gateway is using packet forwarding via UDP, ensure the Require authenticated connection is not checked, and type your gateway's 16 digit EUI / MAC address into the Gateway EUI field:
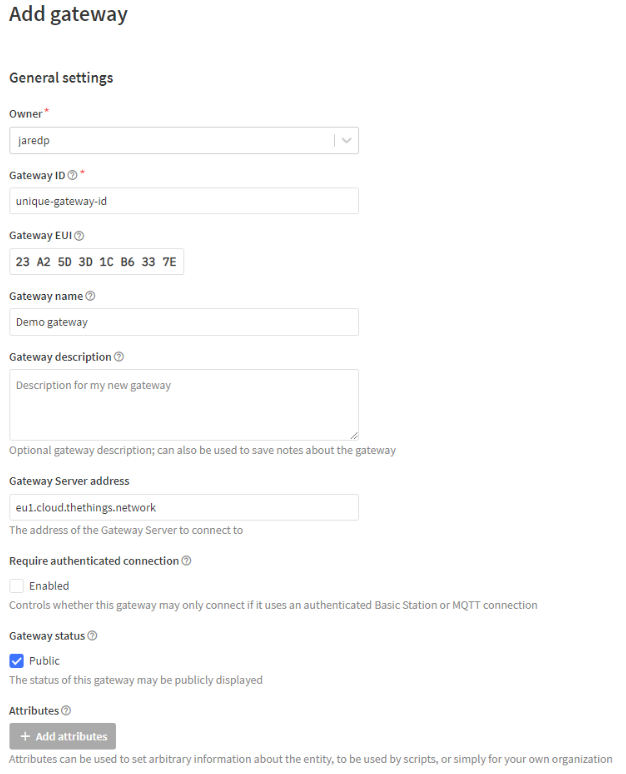
Pick the appropriate Frequency plan, and enter the Gateway Server address. A default address will be provided for you based on the region of the TTN cluster chosen. After registering your gateway, you must configure the packet forwarder on your gateway to send to the gateway server address that you entered. Please see your gateway documentation for the correct procedure. Other settings can be left at their default values, unless changes are required for your setup. Select Create gateway to complete the setup.
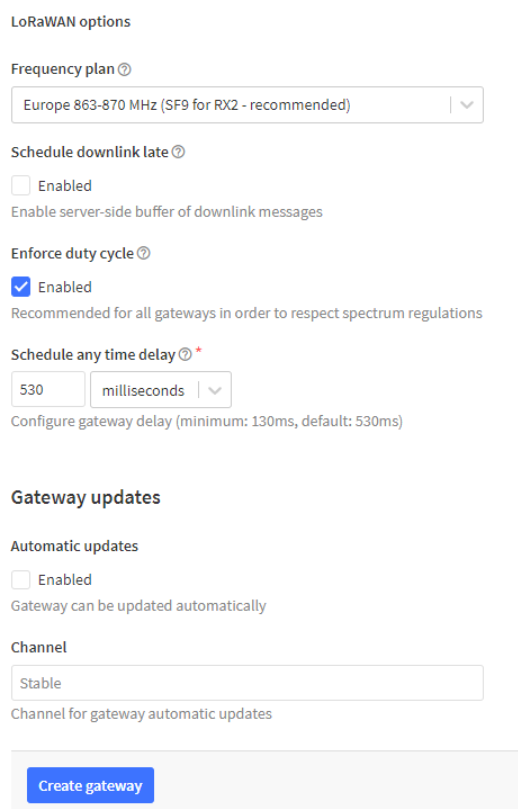
If you need more help with gateway setup, please see the TTN documentation here. Some gateways require special tweaks to their configuration files. If you are having difficulty with the setup, try searching the forums here for a solution.
Once your gateway is set up and turned on, you should be able to see any LoRaWAN traffic it sends or receives in the Live Data page for your gateway. It will however remain encrypted on this page.
4. Add an application
Applications are groups of devices that speak the same protocol, and whose data must be forwarded to the same destination. Here we will create a single application that will contain all of your devices. If you like, you can create several separate applications to further group your devices. On TTN, they are allowed to share the same AppEUI.
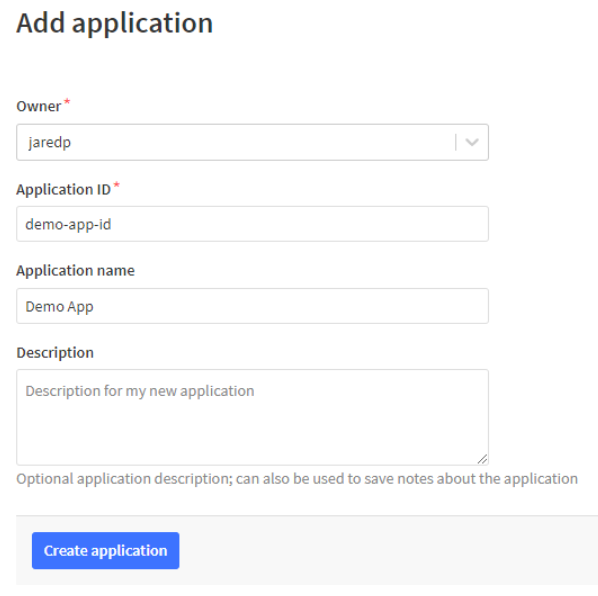
Click Applications on the top bar of the console, then click add application. Fill in an Application ID and optionally, an Application Name and Description. Finally, select Create application:
5. Optionally, set the payload format
Select your application, then click Payload Formatters, then Uplink. Supplying a decoder on this page will improve the output on the Live Data page, which makes debugging and monitoring much easier.
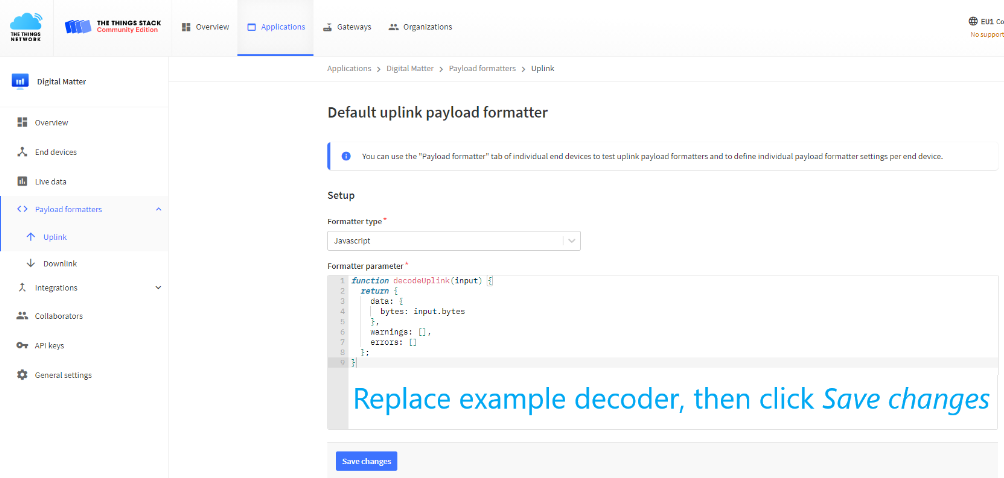
Once your application is set up, you should be able to see any LoRaWAN traffic it handles in the Live Data page for your application. Unlike the gateway's Live Data page, the application data page will show the decrypted and decoded data.
6. Add devices to your application
6.1 Devices in LoRaWAN device repository
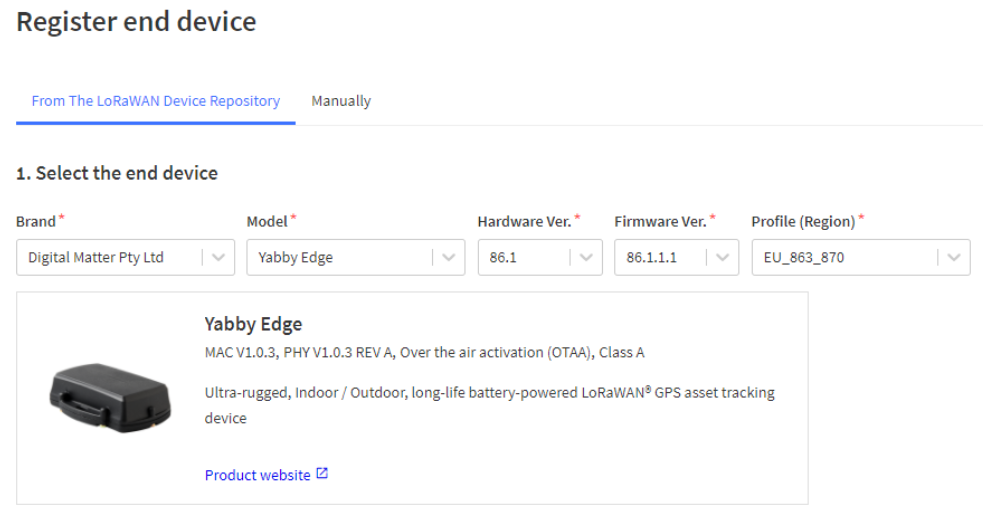
Select your application, then click End devices, and Add end device. Select the From The LoRaWAN Device Repository tab. On this view, use the dropdowns to find the Digital Matter device of interest. Select the correct Hardware Version, Firmware Version, and Profile (Region).
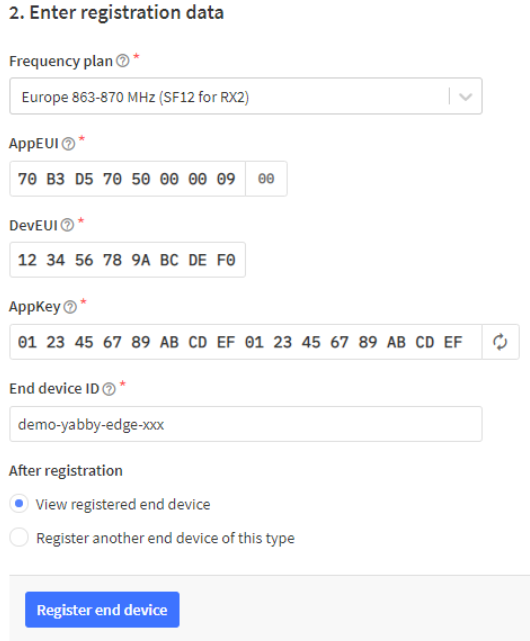
Select the Frequency plan, and enter the device AppEUI, DevEUI, and AppKey, along with a unique End device ID. The default AppEUI for the Yabby Edge LoRaWAN is 70B3D57050000009. DM LoRaWAN™ Default Application EUI's (AppEUI). Select Register end device to complete the device registration.
6.2 Devices not in LoRaWAN device repository
Select your application, then click End devices, and Add end device. Select the Manually tab. On this view, select the Activation mode (OTAA recommended as it is more secure), select the LoRaWAN version (refer to the device's configured stack version via a configuration app). The remaining default values can be left untouched unless customisation is required for your setup. Select Start to proceed.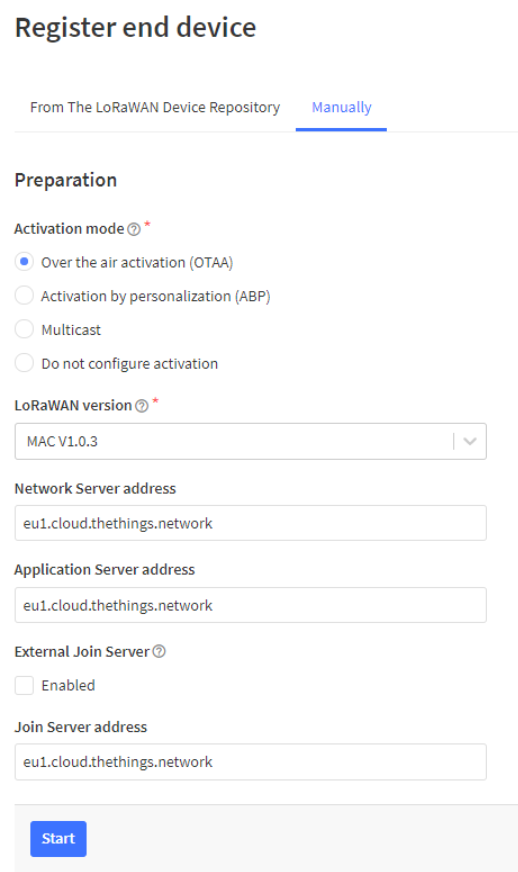
Choose a End device ID, End device name (optional), and End device description (optional). Enter the DevEUI and AppEUI printed on the device's box. Unlike the DevEUI, the AppKey is not printed on the device itself, as it must remain secret. You can however read or change the AppKey and AppEUI using a configuration cable. The default AppEUI for the Oyster is 70B3D57050000000. DM LoRaWAN™ Default Application EUI's (AppEUI). Select Network layer settings to proceed.
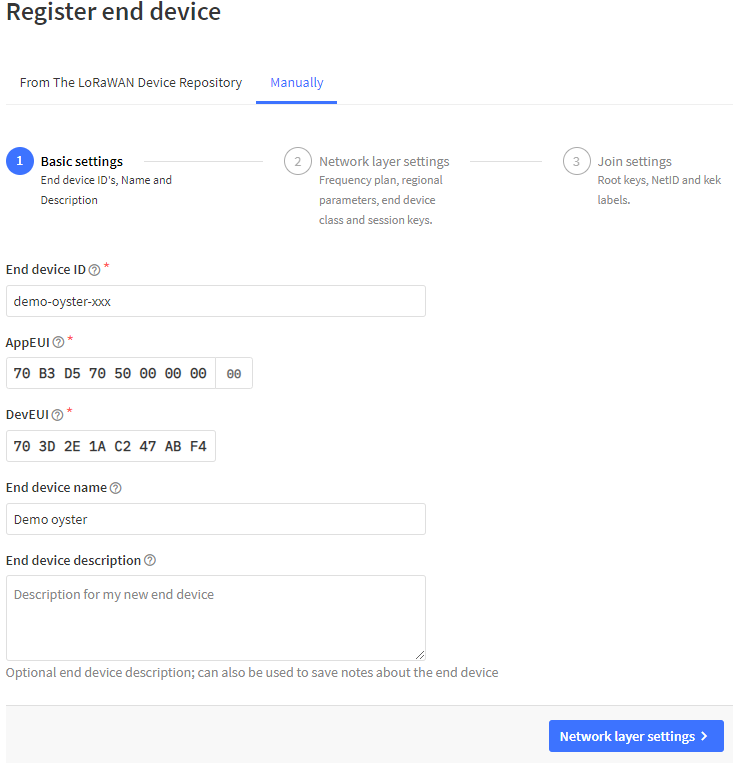
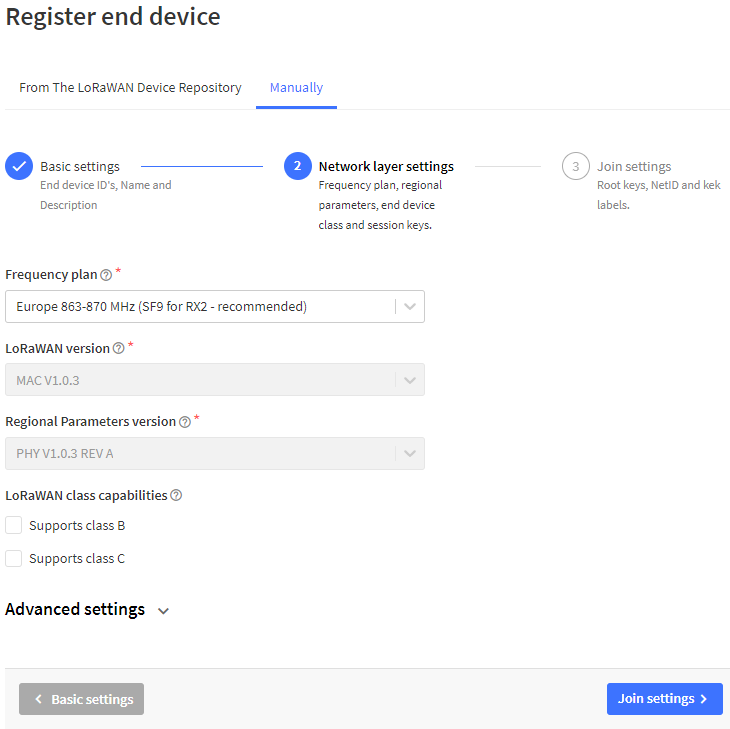
Select the Frequency plan. All other details are already filled, and defaults should be suitable. Select Join settings to proceed.
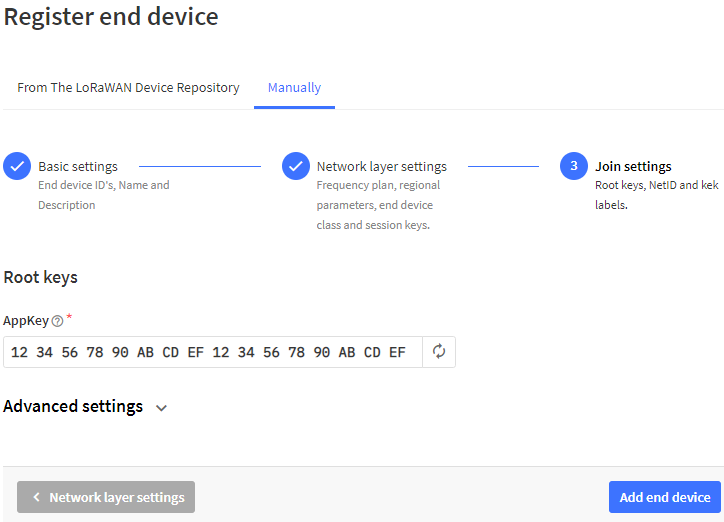
Enter the device AppKey. Select Add end device to complete the setup.
7. Validate device communication via TTN
Once a device is added to your application, it should be able to join the TTN network when turned on, and its data should be visible in the application's Live Data page. Let's consider the case of the Oyster. It can take the Oyster a few minutes to send its first message when turned on, particularly if it has weak GPS signal. Please make sure the Oyster has a good view of the sky when testing, and expect to wait roughly 2 minutes for the first message.
If you see data in the gateway's Live Data page, but don't see any in the application's Live Data page, it means the data is being received by TTN, but can't be recognized or decrypted. Please recheck your AppEUI, AppKey, and DevEUI.
If you see Join requests on the application's Live Data page, but the device never manages to finish the Join procedure and start sending real data, you may have a gateway or network problem. Possible causes include:
- Excessive ping time between the TTN servers and your gateway. You need a good ping, or the replies from the network arrive too late to transmit. Anything above 250 ms may cause problems.
- A mis-configured or faulty gateway. If your gateway is unable to transmit, it won't be able to service Join requests. One possible culprit is the transmit power lookup table that is commonly configurable. If the network asks for a transmit power that is not in the configured table, the gateway will often refuse to transmit. See you gateway manufacturer for help debugging this and similar issues, or try searching the TTN forums here.
- If your region is America or Australia, be sure the Oyster's channel mask is configured to the correct value (using a configuration cable). TTN's channel mask is 02000000000000FF00. If the device is using a different channel mask, the network may still occasionally receive a packet, but most communication will fail.
If you don't see anything in the Live Data page for your gateway, please recheck your gateway configuration, and make sure that your Oyster has been set up with the correct region and channel mask, as mentioned above. Also try refreshing the browser page, as the Live Data page may become unresponsive if left open for too long. Please note that the Live Data page only shows transmissions that arrive after the page is opened. It will never show historical data.
For some additional information see:
