Connecting to Telematics Guru over Helium

Written by Matthew Clark-Massera
Updated at July 13th, 2023
Table of Contents
The Helium Network is the largest, public LPWAN in the United States, and enables long range, low power, bi-directional communication for any LoRaWAN compatible device. The Helium Network is open and permissionless, and requires no up-front payments, contracts or commitments to use. Devices pay Helium Hotspot owners and other Helium Network Operators on a per-packet basis for delivering their sensors packets to the application end point.
1. Signup for a Helium Console account
Browse to Helium Console front page and click 'Sign Up' if you are not already registered. Follow the prompts and complete the email verification step.
2. Open the Helium Console
The console is where you register your devices, create an HTTP integration, set up a label and set up forwarding to your desired endpoint. It is accessed at Helium Console.
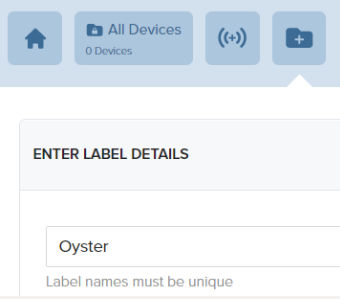
3. Add a Label
Labels are used in Helium Console to organize devices, assign to specific integrations, and provide scalability and flexibility to managing your projects.
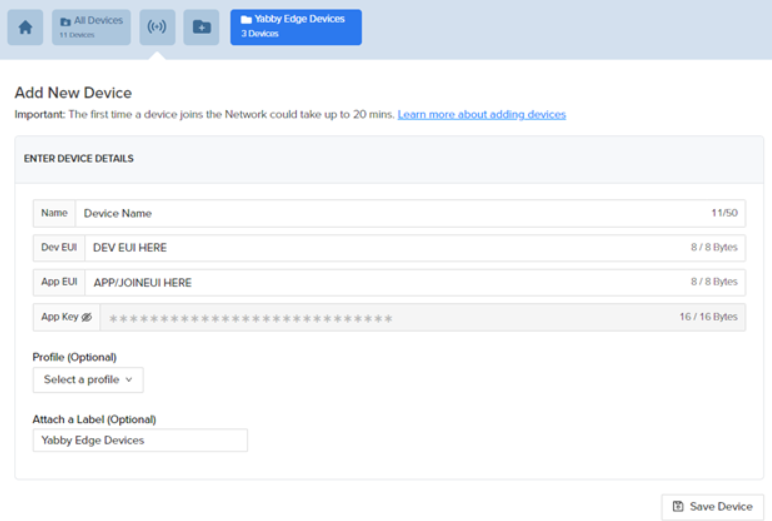
4. Add your device to the Helium Console
Browse to the Devices screen in the console and click on add new device. The fields Dev EUI, App EUI, and App Key will be auto generated but you will need to enter in the credentials provided with the Digital Matter device. Attach the label that was set up in Step 3.
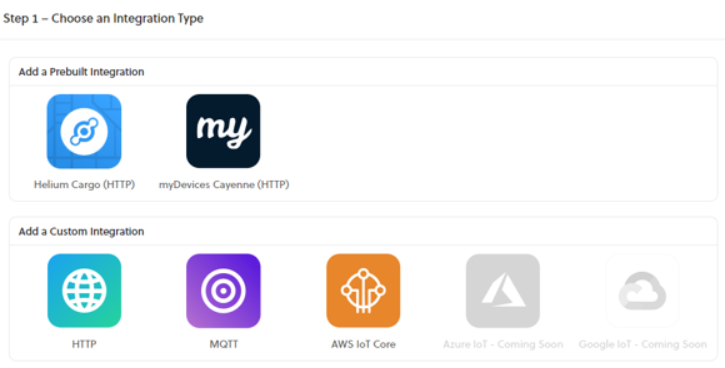
5. Add an Integration
Browse to the Integrations screen in the console and click 'HTTP' under the Add a Custom Integration section. The fields Endpoint, Header, and Value will need to be filled out.
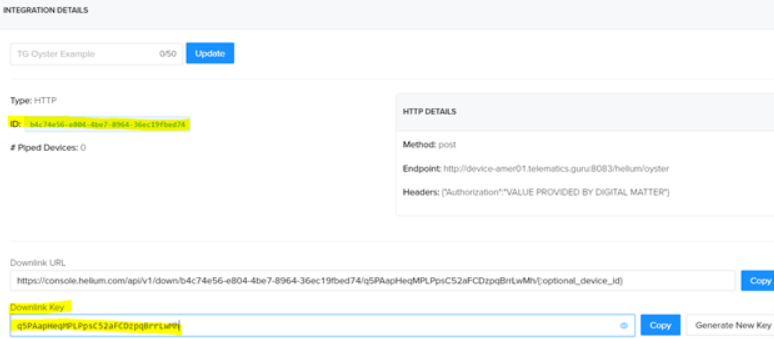
Based on which regional server your partner account is hosted you will need to use the related URL shown in the table below in the endpoint section.
The HTTP header will be Authorization.
The Authorization Field noted as Value should be set using a special username and password obtained from Telematics Guru. TG support will provide these details. The username and password should be combined in the format username:password, and then base64 encoded. For example: abcdef1234567890:fedcba0987654321abcdef1234567890 (username:password) base64 encodes to YWJjZGVmMTIzNDU2Nzg5MDpmZWRjYmEwOTg3NjU0MzIxYWJjZGVmMTIzNDU2Nzg5MA== and should be used in the value section as:
Basic YWJjZGVmMTIzNDU2Nzg5MDpmZWRjYmEwOTg3NjU0MzIxYWJjZGVmMTIzNDU2Nzg5MA==For downlinks to work through TG, each device type will need to have its own authentication details. Please confirm with Digital Matter support each device type that you are using so that all authorization details can be generated.
Once that information is provided by Digital Matter, you will need to give the Helium Integration ID and Helium Downlink Key for each integration you have set up.
Based on which regional server your partner account is hosted you will need to use the related URL for the endpoint. The end of the URL dictates which device type. You will need to input oyster, oyster3, yabby, g62 or guppy depending on device type.

6. Add Flow within Helium to connect devices to your integration
Browse to the Flows section within Helium. Flows is a visual-centric view of the key elements in Console. This allows users to instantly understand the relationship among devices, functions, and integrations.
- Select Nodes -> Labels -> click and drop the label into the field that was set up in Step 3
- Select Nodes -> Integrations -> click and drop the integration set up in Step 5
- Connect the two nodes together
All devices inside the label will now be associated with the integration.

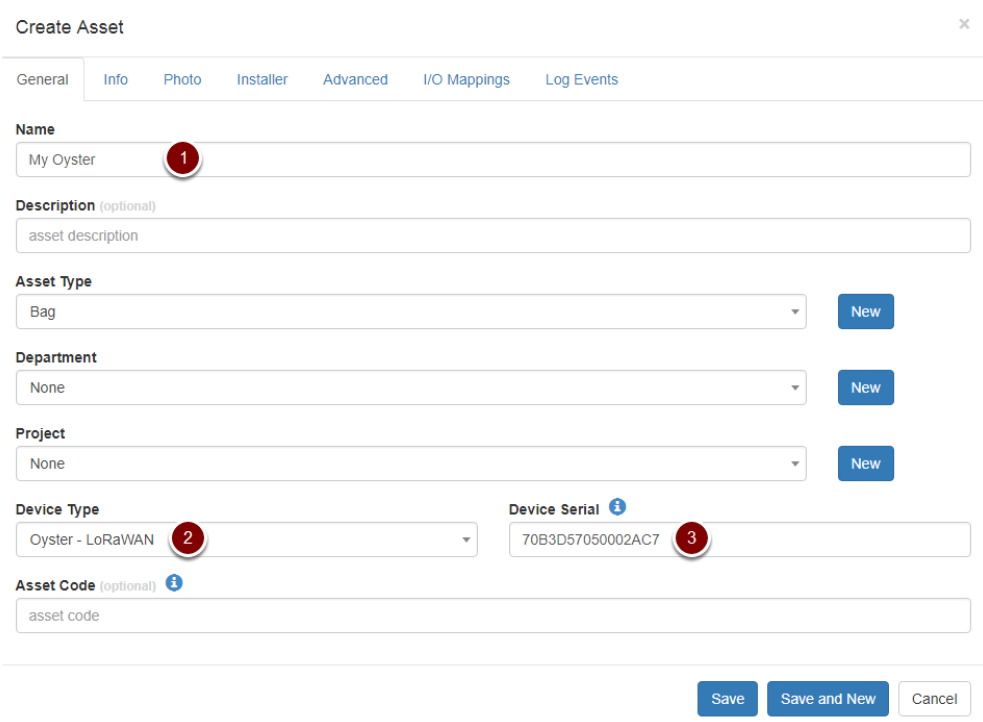
7. Create an asset on Telematics Guru
Log in to your Telematics Guru account, navigate to the Assets page, and click Create New Asset:

Now choose a name, select the correct Device Type, enter the DevEUI in the Device Serial field, and click Save:
If all of the previous steps have been followed correctly, new data points should start populating the Telemetry and IO Telemetry pages as soon as the Oyster gets its first GPS fix. The Oyster's location should also start updating on the live tracking page.