Hawk - Configure Action on Digital Input Change

Written by Matthew Clark-Massera
Updated at October 6th, 2023
Table of Contents
The Hawk and I/O cards have Digital Inputs available.
- Hawk Digital Input 1
- Digital Input on the Baseboard
- Mapped to Hawk Digital Input 1 the Hawk data
- Configured under Digital Input 1 parameters
- Ag-Tech 1 has a digital input
- Uses I/O 7 on baseboard
- mapped to Hawk Digital Input 8 in the Hawk data
- Configured on the AgTech1 Card and Card Digital Input parameter tabs
- RS1 has a digital input
- Uses I/O 7 on baseboard
- mapped to Hawk Digital Input 8 in the Hawk data
- Configured on the AgTech1 Card and Card Digital Input parameter tabs
On the Hawk, we can use Digital Inputs in the following ways:
- Simple Monitoring (is a pump on/off)
- Run tasks on input change e.g.
- Turn output on
- Sample sensors
- Pulse Counting - see Hawk - Configure Pulse Count
This guide focuses on 1 and 2. For pulse counting see the linked article.
Active Level and Bias Resistor
Digital Inputs use these concepts, expand below for more information.
About Active Level/Bias Resistors
Digital Inputs have a configurable 'Active Level' and Bias Resistor.
- The Active Level determines the physical line level (high or low) at which the input is considered on.
- The Bias Resistor essentially determines the state of the input when nothing is connected to the input. Since often we would leave them disconnected, or 'open circuit' meaning the state isn't well defined. The bias resistor handles this.
There are 3 options:
- Pull up: pull the input high
- Pull down: pull the input low
- Disable: do not bias the input
These options are useful when one of the states being read is open-circuit (disconnected/high impedance). In this case, enable the bias resistor setting in the opposite state to the level being switched to. This is commonly used when working with an "open collector" output. The pull up/down is a "weak" pull up/down.
Results of different configurations.
| Bias Resistor | Active High | Input | Result |
|---|---|---|---|
| Pull Down | True | Low | Inactive |
| High | Active | High | Active |
| Pull Down | False | Low | Active |
| High | Inactive | High | Inactive |
| Pull Up | True | Low | Inactive |
| High | Active | High | Active |
| Pull Up | False | Low | Active |
| High | Inactive | High | Inactive |
Baseboard Digital Input Configuration
Add the Digital Input 1 Parameter Tab to configure the input.
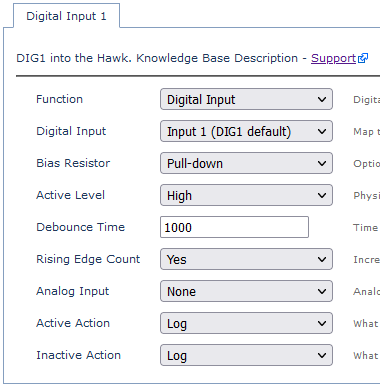
- The above configuration (Pull-Down/High) will register the input as on when there is > ~2.2V on the input - i.e. detecting a pump is on.
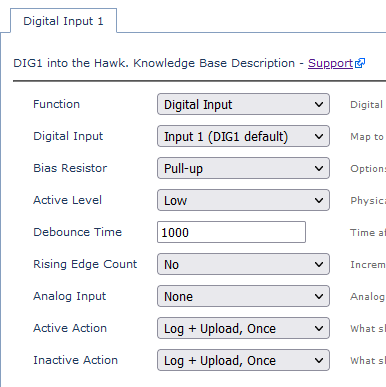
- Pull Up/Low would be used for a close to ground switch.
- Pulse Counting Parameters (for pulse counting setup see Hawk - Configure Pulse Count)
- Set the Debounce Time. For counting fast pulses this needs to be low (i.e. less than the pulse width)
- Rising Edge Count = Yes to enable pulse counting
- Analog input to store pulse count if desired
- Active/Inactive Actions
- If pulse counting we would not want to log every individual pulse.
- For monitoring applications, we do, and may want to configure Log + Upload to be notified immediately on the server when the output changes.
Example - Door Open/Close Alert
We use a reed switch for this application
- Common contact connected to GND
- Normally open connected to DI1
A 'digital input changed' log will be sent to the server when the door opens/closes.
Card Digital Input Configuration
Configure the Card's digital input on the Card's parameter tab - i.e.

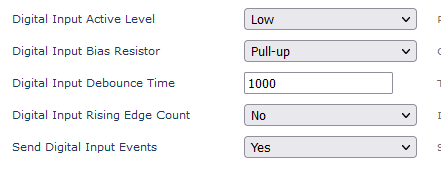
- The active level, Bias and Debounce set as usual
- Digital Input Rising Edge Count
- Set to Yes if Pulse Counting, set to No if not
- Send Digital Input Events
- Set to No if pulse counting, set to Yes for 'monitoring' applications like door open/closed
- This means on input change the card notifies the baseboard, which can then take action (log, upload etc)
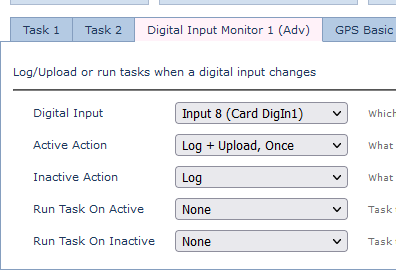
Digital Input Monitor
The Digital Input Monitors then dictate what the Hawk should do if the input changes.
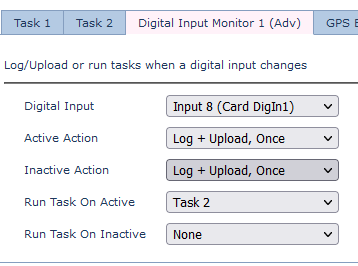
We use these parameters to determine the "Active Action" and "Inactive Action" if using the Card Digital Input. The parameters below will cause the Hawk to upload if the Card Digital Input goes active.
Tasks can be run in response to input changes.
Example - Turn on Pump for 30 sec if float switch activated
In terms of what the Hawk is doing, we will turn on the Switched Ground Output if the Card Digital Input Goes Active
Card Parameters
Input Monitor Parameters
Log and Upload on the input change, and Run Task 2 (which will be to turn on the output)
Task 2
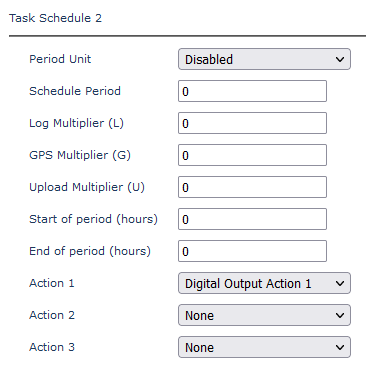
Digital Output Action 2
Turn on the Switched ground for 30 seconds.