Hawk - Configure Analogue Input Readings

Written by Matthew Clark-Massera
Updated at November 26th, 2024
Table of Contents
Many industrial sensors. Such sensors output a voltage proportional to the signal (pressure, temperature, moisture, vibration) they are measuring.
i.e. 0V for 0°C and 10V for 100°C.
Benefits
- Low Cost
- No integration required - any analogue sensor that fits within the range of the device it is connected to can be read
- Readily available
Drawbacks
- Some can be prone to noise/inaccuracy due to electrical interference
Wiring
To properly use an analogue sensor with the Hawk, you need to wire it sensor into:
- An Analogue input on the Hawk card.
- The Vboost or 3v3 Switch Power on the Hawk Card (Depending on your analogue sensor, usually Vboost).
For details on different cards IOs, please see this article.
For example, when using the RS1 plug-in card, the I/Os of interest are:
| Hawk IO | Function |
| 1 | Analogue Input (0-30V range) |
| 2 | VBoost |
Analogue sensors generally come in 0-5V or 0-10V versions. They will need to be provided a voltage at least that of their full range. i.e. a 0-5V sensor needs at least 5V power supply.
Refer to the manufacturer's datasheet/wiring guide for the wiring instructions.
Configuration
We now need to configure the Hawk to:
- Wake up on a schedule to take a reading - (Set up a Task)
- Power on the sensor at the correct voltage (via the Vboost rail)
- Sample the sensor after some time (warm-up delay)
- Log the reading and optionally upload.
Configure Task
Configure a task at your chosen frequency - choosing Analogue Action 1 as an action.

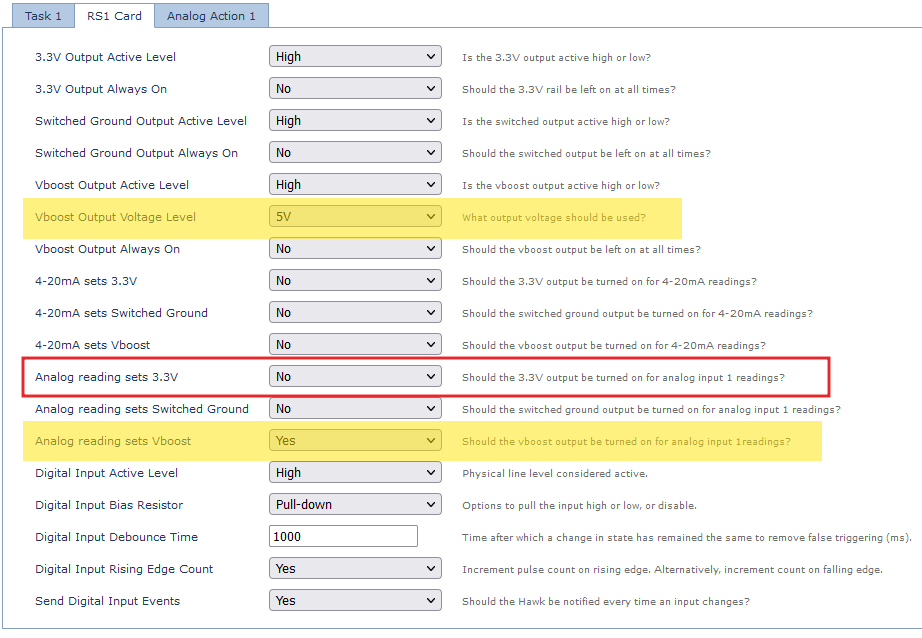
Example: Configure RS1 parameters
Set Output Voltage to power the sensor.
When taking a reading, we can choose to power the sensor with 3.3V, 5V or 12V.
Shown below is to power with 5V.
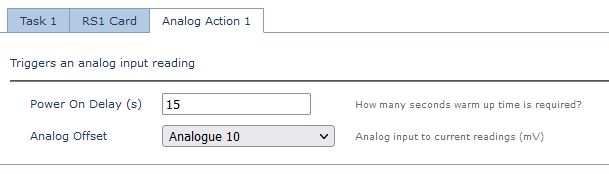
Analogue Input parameters
Set the power on delay and the Analogue which the reading should be mapped to.
Reading Conversion
With the above parameters, the output would be:
| Value | Analogue | Units | Conversion Example |
| Distance | Analogue Offset Value (Analogue 10) | mV | 2500 = 2.50V |
Analogue Value Conversion and Mapping in Telematics Guru
- When using the Analogue Input, this simply records a voltage. We need to translate this into a meaningful value. i.e. tank level, temperature, pressure etc.
- We can convert the value by creating an I/O mapping.
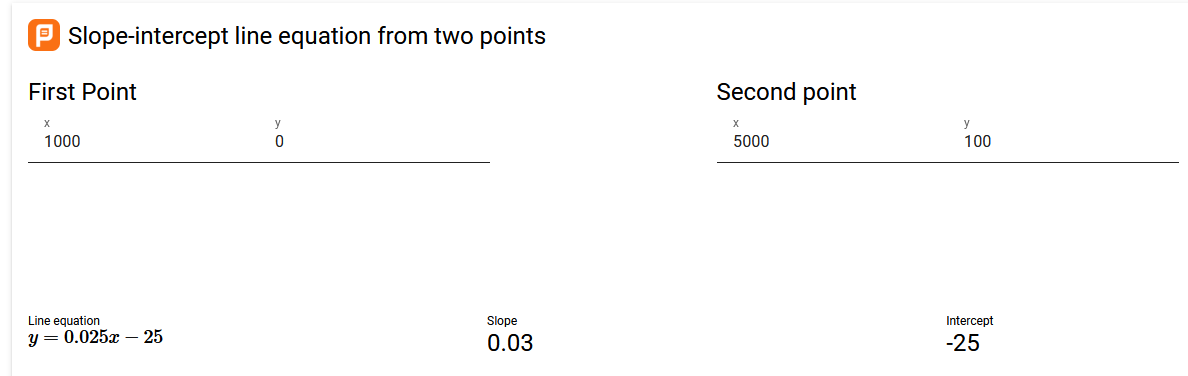
Conversion Example
- We have a level sensor which outputs 1V when the tank is empty (0%), and 5V when full (100%)
- This gives us (1, 0), (5,100) in terms of x and y coordinates.
- Telematics Guru allows us to enter a conversion factor and offset

- We can use this to create an equation of the form y = mx + c
- x = voltage
- y = tank level
- i.e. the relationship between tank level from a given voltage.
- Handy calculator - https://planetcalc.com/8110/

Analogue to Digital Conversion
ADC has a 12-bit resolution with 9mV per bit.
Max Error is +/-4 bit, typical is 2 bit.
Readings are typically ~2% accurate.
0-5V → 1.62mV resolution and a ~94k Ohm impedance.
5-30V→ 9.67mV resolution and a ~52k Ohm impedance