Connecting a Solar Panel

Written by Matthew Clark-Massera
Updated at April 28th, 2026
Table of Contents
Hawk Pro NTN — important differences: The physical charge-rate switch on the Hawk Pro PCB has been removed on the Hawk Pro NTN. Charge rate is now controlled via a system parameter — no PCB access required. In addition, Vbatt / Vext detection is automatic on the Hawk Pro NTN, so no manual Device Manager configuration is required when running from external power. The rest of this article (panel selection, voltage requirements, wiring) applies to both the Hawk Pro and Hawk Pro NTN. See the Hawk Pro vs Hawk Pro NTN article for full details.
The Hawk Pro and Hawk Pro NTN can be fitted with a 3500mAh LiPo rechargeable battery.
Hawk Lite
The Hawk Lite does not have an internal rechargeable battery and therefore is NOT compatible with external solar power.
For permanent installations, aggressive sampling/upload rates, or when using power-hungry sensors - a solar panel can be connected to the Hawk Pro.
DO NOT CONNECT THE HAWK TO A SOLAR PANEL AND AN EXTERNAL BATTERY SIMULTANEOUSLY THROUGH THE SAME EXTERNAL VOLTAGE INPUT.
Without proper protective circuitry in place to protect the external battery and the solar panel, current WILL flow in the wrong direction and could cause a fire or damage to components.
Panel Requirements
As of the November 2023 build, Hawk Pro PCBs come with a switch to allow customers to select between ‘low’ (85mA) and ‘high’ (400mA) charge rates. When customers may receive their first devices of this type is dependent on demand and available stock on hand.
Devices with serial numbers greater than 886406 will have this switch.
Setting the switch to “Off” will set the charge rate to “Low”. Keeping the switch “On” will keep the charge rate “High”.
By default, all boards will have the charge rate set to “High”. Only turn this switch "Off" if you want to connect the Hawk to a small (~1W) solar panel.

|
Low Charge Rate |
High Charge Rate |
Charge Rate |
85mA |
400mA |
Minimum Panel Size |
1W+ |
5W+ |
Switch Configuration |
“Off” |
Default ("On") |
All panels must provide 6V+ (Hawk min operating voltage).
For continuous operation at high temperatures and high output load currents, we recommend an input voltage of 12V or higher.
Example Panel
This panel from DF Robot is a great example of one that could be used with the Hawk:
Connections
Connect the panel to the external power terminals on the Hawk base-board (Vin + GND)

Charging Internal Battery
In order to charge the internal battery, the input voltage must be switched to 5V to work correctly with the charging circuit.
Path:
-
V_in -> switcher -> 5V ->charger
-
The switcher is ~90% efficient when converting an input voltage to 5V.
-
The Hawk internal battery is charged at a maximum current of 400mA.
-
Therefore, 400mA at 5V = 2W.
-
Accounting for ~10% conversion loss, the power required is ~2.2W.
-
Therefore, a 5W panel is recommended to ensure 2.2W can be met even when the panel isn't in strong sunlight.
The internal battery is charged at a maximum current of 400mA. This means it will take 8hrs 45 min to fully charge the battery from empty.
Charging in Extreme Temperatures
It is important to note that the backup battery will not be charged if the temperature is <-10°C, or >45°C. This means that if the device is left exposed to the sun on a hot day, a solar panel will not charge the battery.
Ensure you take measures to reduce the internal temperature of the unit as much as possible (i.e. mount the device under the panel in the shade).
Monitoring Panel Output/Hawk Charging
-
The Voltage output by the panel will simply be the input to the Hawk, which is reported in Analogue 2.
-
The battery is fully charged at ~4.1V.
-
The battery is empty at approximately 3.6-3.7V.
Vext Digital Input
The Vext Parameter tab can be configured to map the external power status (Good/Not Good) to Digital Input 3.
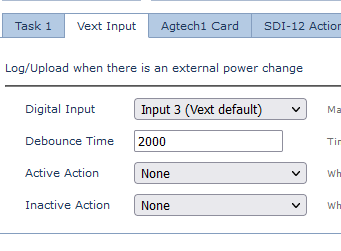
In general, it is best to leave this on defaults (no active or inactive action) - since a solar panel voltage may fluctuate during the day leading to a large number of unnecessary logs.
This is more typically used when connected to mains power and we desire an instant alert on the server when this is disconnected.