Setting Connectors
How to Apply a Connector to your Device within Device Manager

Written by Matthew Clark-Massera
Updated at July 17th, 2025
Table of Contents
Setting Connectors
This article assumes that you have already read and understood Creating Connectors such that you have created a Connector of your very own and now wish to use it to transmit device data. Please click here to read that article.
Setting a Connector within Device View
When on the Device View page for a device, simply remain on the Details tab and click on the blue text to the right of the word Connector.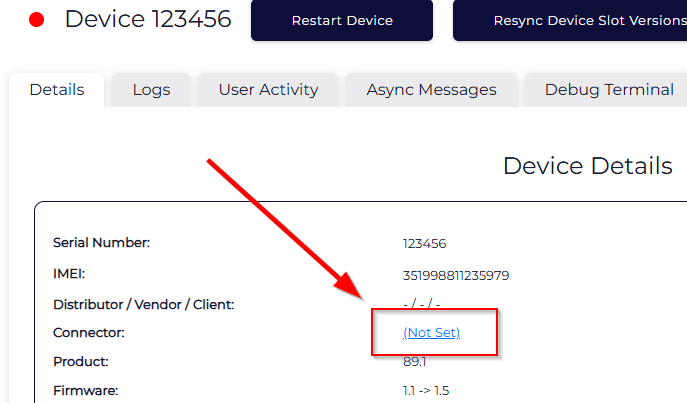
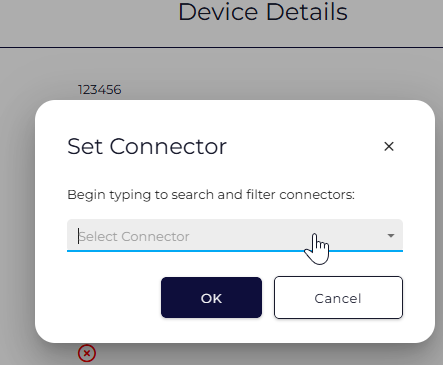
The Set Connector popup will appear, along with a dropdown menu containing all possible connectors you can choose. Select from the dropdown list and click OK.
Setting a Connector from the Device Grid
Setting a Connector on the Device Grid can be done for a single device or for multiple devices at once.
Setting a Single Device
- Locate your device within the Device Grid by searching and/or filtering until it is visible as a row within the Device Grid Table.
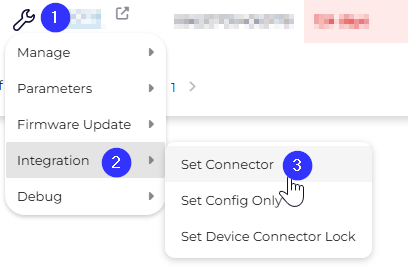
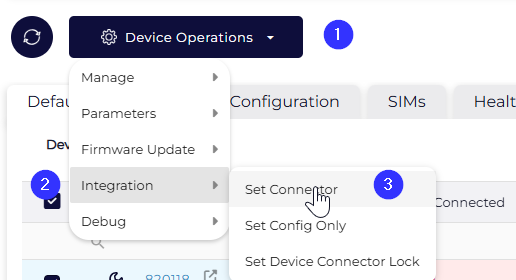
- Click on the contextual Device Operations wrench, then the Integration submenu, and finally click the Set Connector button.
- The Set Connector popup will appear, along with a dropdown menu containing all possible connectors you can choose. Select from the dropdown list and click OK.
Setting Multiple Devices
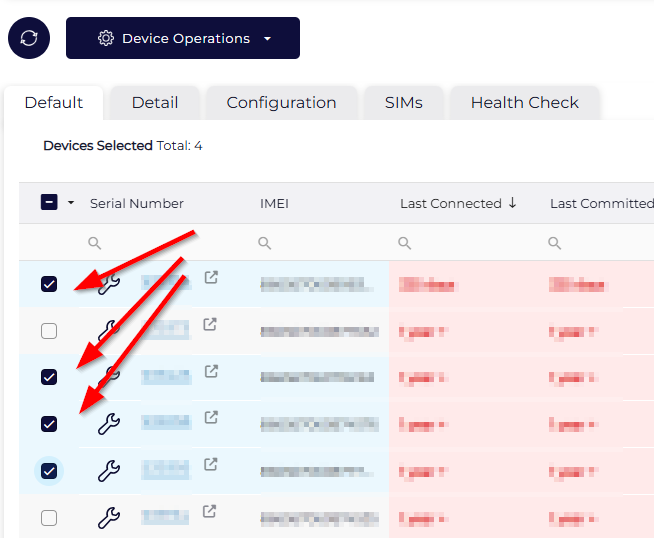
- Using the Device Grid search and filter to ensure that you have your target devices available within the Device Grid, use the checkboxes on the left-hand side to select all of the devices that you wish to modify.
- Click the navy Device Operations button at the top left of the Device Grid, selecting first Integration and then Set Connector.
- The Set Connector popup will appear, along with a dropdown menu containing all possible connectors you can choose. Select from the dropdown list and click OK. You will receive a popup asking for a second confirmation.
Troubleshooting/FAQ
Nowhere to Go
If a device connects into Device Manager and has not yet had a Connector set against it, then any transmitted data will be discarded when it reaches the server.
What Connector should I set?
If you're asking this question, chances are that you are a Telematics Guru reseller that is wondering which of the several server options to choose from. The easiest way to find this out would be to log out of your Telematics Guru user account, and then use the sign in page to show what connector/server to set.

According to the above image, the server is “APAC 3”. So in Device Manager, you can set the connector as TG (APAC 03). Once you create the asset in Telematics Guru, the device will start sending the data to server “APAC 3”.
If you are not a Telematics Guru reseller, and are confused about which connector to choose, then you will either need to follow the steps outlined in Creating Connectors to make your own connector or contact the lead user within your organization to find out what they have created for you.
I'm not getting any data to my endpoint
To debug, go back to the Device Grid in Device Manager, and verify that the device has connected in recently. If it has not, then the issue doesn't lie with the connector. Therefore either wait for the device to upload, 'force' a connection from the Device View, or see Troubleshooting - Devices Not Connecting.
If it has, you may see that the Since Connected and Since Committed times don't align - in that case see Since Committed/Since Connected and Troubleshooting. First step is to View Server Logs.
My new Edge devices have the same Connector as I've been using for everything else, but they aren't working properly.
Edge devices will require a special Connector to be created that includes a Forwarder so that data can be pre-processed within the Location Engine. For instructions on how to do this please consult Configuring Forwarders.
Next Steps
Now that you have set a Connector for one of your devices, it is probably a good idea to install your devices such that you can begin to receive data into your platform. Please see How to Use the Installer Page to begin this process.