Setting up a Yabby Edge LoRaWAN Device via Actility (ThingPark Wireless and ThingPark Enterprise)
Table of Contents
Check your Actility Version
Actility provide two different LoRaWAN products
- ThingPark Wireless: This platform powers large scale public LoRaWAN networks
- ThingPark Enterprise: This is the solution for deploying dedicated private LoRaWAN networks
1. Setup your Yabby Edge LoRaWAN devices using the LoRaWAN Provisioning Tool
The LoRaWAN provisioning tool can be downloaded here.
Please see Yabby Edge LoRaWAN - configuration and Usage.
Note: It is important to configure the Region and Scanning parameters.
2. Get access to ThingPark Device Manager
Each network has a separate instance of device manager. This is commonly found at a URL such as https://yournetwork.thingpark.com/deviceManager
- Login to Device Manager.
3. Create the "Application Server"
This defines where the Actility network server should send the data. In this case, the data needs to be sent to the OEM location engine.
- Go to Application Servers in the left hand menu.
- Click Create. Enter a name and choose the HTTP option:

- Change the Content Type to JSON.
- Activate the Uplink/Downlink security. Enter the required details and click Save. Note that this screenshot is just an example - please enter your unique details.

- Click Add a Route. Source port can be left as *. The strategy is not important, unless you have multiple destinations. Add a single destination in the form:
https://oem-event-processors.azurewebsites.net/api/LoraActility
- Save your Application Server setup with the button in the top right.
4. Add application server security details to OEM
- Navigate to the Manage dropdown on OEM and click on 'LoRa Network Credentials'.
- Click "New" to create a new entry.
- Select the relevant Vendor/Client.
- Enter a name for the network credential entry.
- Select "Actility" from the LoRa Network Code dropdown.
-
Tick the "Enabled" checkbox.
-
Tick the "Is Enterprise" checkbox if you are using Thingpark Enterprise
-
Enter the App Server Id (called 'AS ID' on Actility) and LRC As Key(called 'Tunnel Interface Authentication Key' on Actility) that were created in Step 3 above.
-
Enter the relevant downlink URL for your application (i.e. https://api-eu.thingpark.com/thingpark/lrc/rest/downlink).
For Australian Thingpark Enterprise clients, try https://thingparkenterprise.au.actility.com/thingpark/lrc/rest/downlink
Best to contact Actility and check which downlink URL that should be used for your region.
- Click "Create" to complete the creation.
5. Create an Application Server Routing Profile
- In the left hand menu, click AS routing profiles
- Click Create.
- Give it a name, such as "OEM LE Routing". Click Create.

- Under Destinations, click Add. Choose Local Application Server as the type. Select the destination you created above.

6. Add your device
- In the left hand menu, go to Devices.
- To add a new device, click Create.
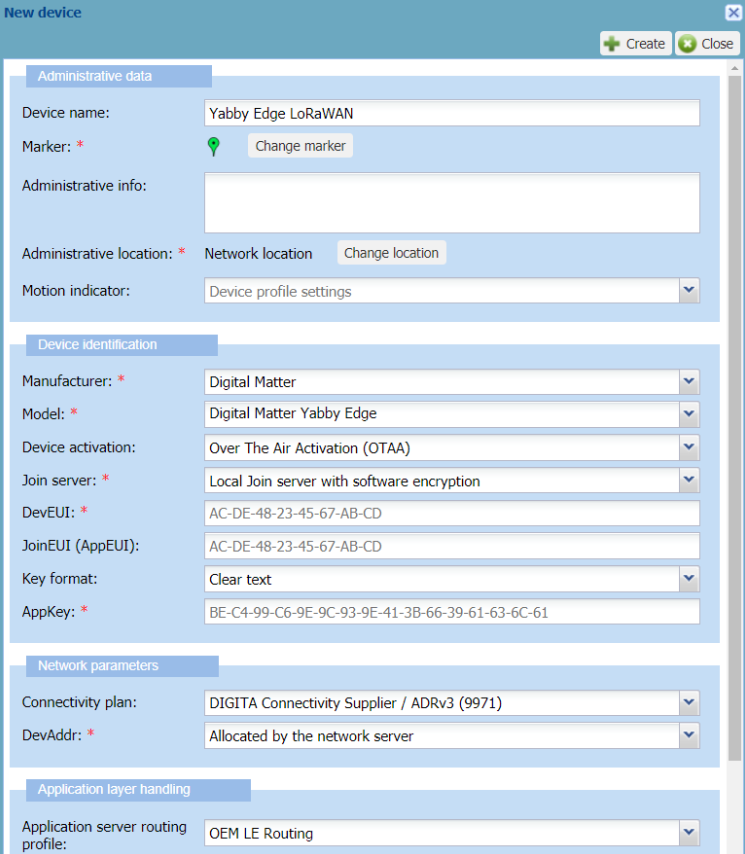
- Fill in the fields in the New Device dialog. Here are some helpful notes:
- The Administrative Data section is entirely user selectable. It will not prevent the device from working. Choose a useful name.
- If your application allows for a manufacturer to be specified, select Digital Matter and set the device model to Yabby Edge.
- Select either OTAA or ABP device activation. We recommend OTAA as it is more secure.
- The various keys are available on a sticker that ships with the devices. They can also be found (and copy/pasted) from the config app - this is recommended to avoid typos. The App Key and App EUI may be reconfigured in the config app too. Ultimately, whatever is on the device when deploying should be entered into this dialog.
- Dashes are not required in the keys, and case is not important. AC-DE-48-23-45-67-AB-CD is equivalent to acde48234567abcd.
- Device profile - LoRaWAN 1.0.2 class B / 1.0.3 class A generally works well (only needed if the manufacturer/model selection is not available
- Your network provider should supply the connectivity plan.
- Leave the DevAddr as Allocated by network server, unless you are an advanced user.
- Be sure to choose the AS routing profile you setup above.

- Editing a device after creation is limited. It does not appear to be possible to change the Dev EUI, App EUI, or AppKey without recreating the device. It is possible to change which Network Routing Profile is assigned to a device. Click the edit icon on the right of the device. In the left hand menu, under the selected device, there should be a network option. Within that page, it is possible to edit "Network Routing".
7. Create a Forwarder on OEM
This step is only relevant if you need to forward data to your own platform. This step is not applicable if you are using TG.
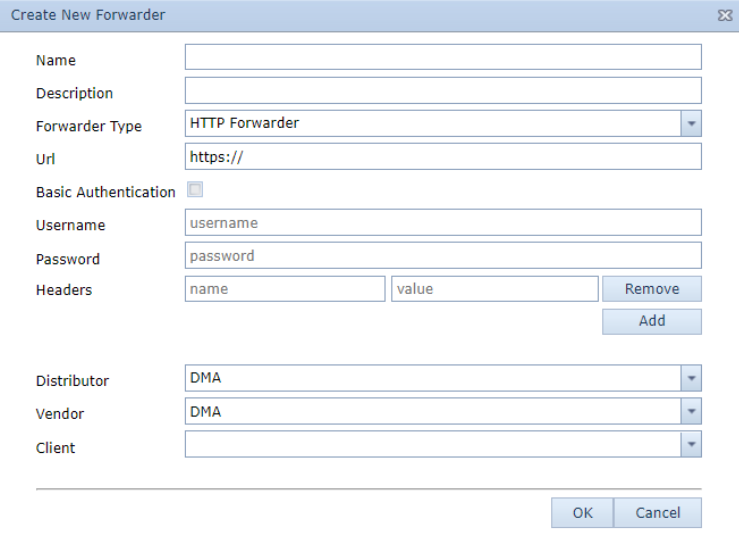
A Forwarder is an HTTP connector which allows the Location Engine to forward the "solved" device data to an end platform.
Browse to Forwarders on OEM and click 'New'.

Note:
Make sure to “Assign Partition” after creating the forwarder.
8. Set the Location Engine Lookups and Forwarder
Browse to LoRa Devices on OEM and select your devices.
- Click on 'Device Operation' and 'Set Network Credentials'. Select the entry you created in Step 4.
- Click on 'Device Operation' and 'Set Location Engine Lookup Settings'. Select Default Profile. This profile will cover 99% of use cases. Test on this profile initially, if you have have specific requirements, speak to your support team to have the profile adjusted if this is required.
- Click on 'Device Operation' and 'Set Forwarder'. Select the TG forwarder for your region or the entry you created in Step 7.
