SensorNode - Digital Input Setup

Written by Matthew Clark-Massera
Updated at January 27th, 2023
Table of Contents
General Setup
The SensorNode has 2 digital inputs. These are general purpose on off inputs. They have configurable pull up/down resistors, to allow them to work with open drain style interfaces.
The inputs will read as 'on' when driven above ~3.3 V, and 'off' when below ~0.8 V. The threshold voltages vary slightly depending on the pull up/down configuration. The maximum input voltage allowed is 30 V.
The parameters that apply to the digital inputs are shown below:
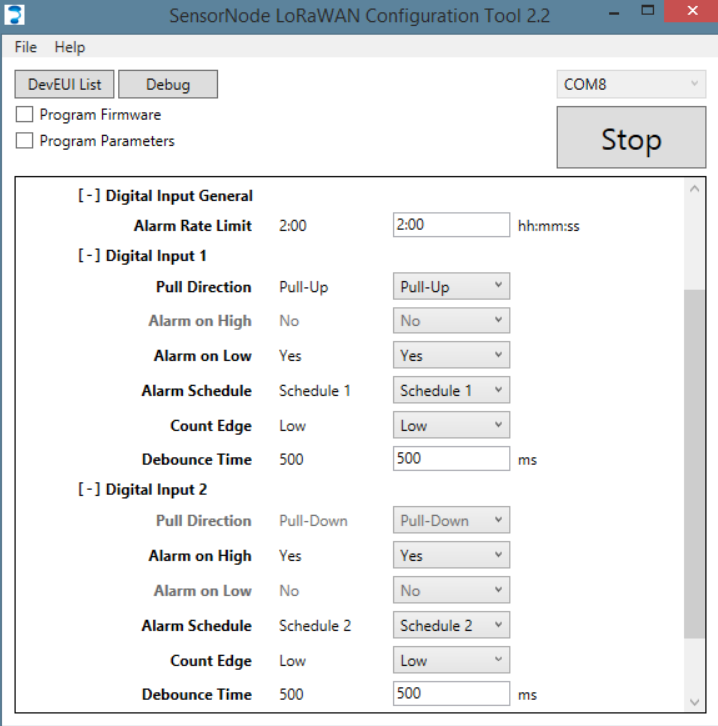
- Alarm Rate Limit: alarms logged faster than this will not be sent. Eg. With a default of 600 s, a maximum of 1 alarm can be sent every 10 min. If input changes happen faster than this, the state will change on the device, but an alarm will not be sent.
-
Pull Direction: this setting controls the weak internal pull direction:
- Pull up: with nothing connected, the input will read high. This is useful with open drain interfaces, where the external interfaces either pulls to ground, or goes high impedance. Note: there is a small 70 uA per input penalty for using this pull up setting. Depending on your setup, this could affect battery life.
- None: the SensorNode will not bias the input.
- Pull down: with nothing connected, the input will read low. This is useful with an external interface that goes "off to "on" (low to high voltage).
- Alarm on High: send an update if the input changes to a high state. The update is sent if there is LoRaWAN duty cycle available (region dependent) and the Maximum Alarm Rate has not been exceeded.
- Alarm on Low: send an update if the input changes to a low state. The update is sent if there is LoRaWAN duty cycle available (region dependent) and the Maximum Alarm Rate has not been exceeded.
- Alarm Schedule: triggers one of the configured schedules when the alarm goes off.
- Count Edge: when counting changes, should the counter be incremented on the change to low or the change to high. Low means count on change from High to Low. High means count on change from Low to High.
- Debounce Time: the state of the input is updated when it has stopped bouncing (changing state) for this amount of time. ie. 1000 ms means it must stay in the new position for 1 sec before updating the state on the device.
- Queue Alarms: if any alarms are dropped due to rate limiting, queue a final alarm to be sent when the rate limiting period expires.
Can the SensorNode send updates on input changes?
Yes. Use the Alarm on High/Low parameters. Choose a Maximum alarm rate that suits your expected change rate, and battery life (lots of changes could lead to lots of transmits, and reduced battery life).
What if the device cannot send an alarm due to the maximum alarm rate or duty cycle?
By default, the update will not be sent. The digital input state will still be recorded on the device, so it will be sent on the next schedule (if configured). However, if the Queue Alarms option is enabled:
- Alarms occurring within the hold-off period will be deferred until the end of the period
- If multiple alarms occur for a particular input, only one alarm will be sent at the end of the period, for that input
- If alarms occur for more than one input, one alarm will be queued for each input. Lower numbered inputs will send their queued alarms first, followed by another hold-off period, and then higher numbered inputs.
How should I use schedules with the inputs?
You have 2 options:
- Configure a schedule to send the current digital input states (Item = "Digital Inputs").
- Configure a schedule to send the current digital input change counts (Item = "Digital Input X Count")