Connecting to Telematics Guru over Actility
Actility is a LoRaWAN network software provider. Actility is a popular choice for large scale public networks.
Telematics Guru supports Oyster LoRaWAN & G62 LoRaWAN data from Actility. For now, it is an uplink only integration.
1. Get access to ThingPark Device Manager
Each network has a separate instance of device manager. This is commonly found at a URL such as https://yournetwork.thingpark.com/deviceManager
- Login to Device Manager.
2. Create the "Application Server"
This defines where the Actility network server should send the data.
- Go to Application Servers in the left-hand menu.
- Click Create. Enter a name and choose the HTTP option:

- Change the Content Type to JSON.
- Activate the Uplink/Downlink security. For now, you will need to contact DM support for an AS ID and LRC-AS Key. This will be available in the TG UI in future. Enter the details provided to you by DM support and click Save. Note that this screenshot is just an example - each partner will need a different set of credentials.

- Click Add a Route. Source port can be left as *. The strategy is not important, unless you have multiple destinations. Add a single destination in the form:
http://<device-region>.telematics.guru:8083/actility/oysterThe device region in the URL is important to target the correct regional instance of Telematics Guru. Refer to this article for an explanation of the regions and the device specific URLs. A short summary is:
Based on the regional server which your partner account is hosted, you will need to use the related URL.

Save your Application Server setup with the button in the top right.
3. Create an Application Server Routing Profile
- In the left-hand menu, click AS routing profiles
- Click Create.
- Give it a name, such as "TG Oyster". Click Create.

- Under Destinations, click Add. Choose Local Application Server as the type. Select the destination you created above.

4. Add your device
- In the left-hand menu, go to Devices.
- To add a new device, click Create.
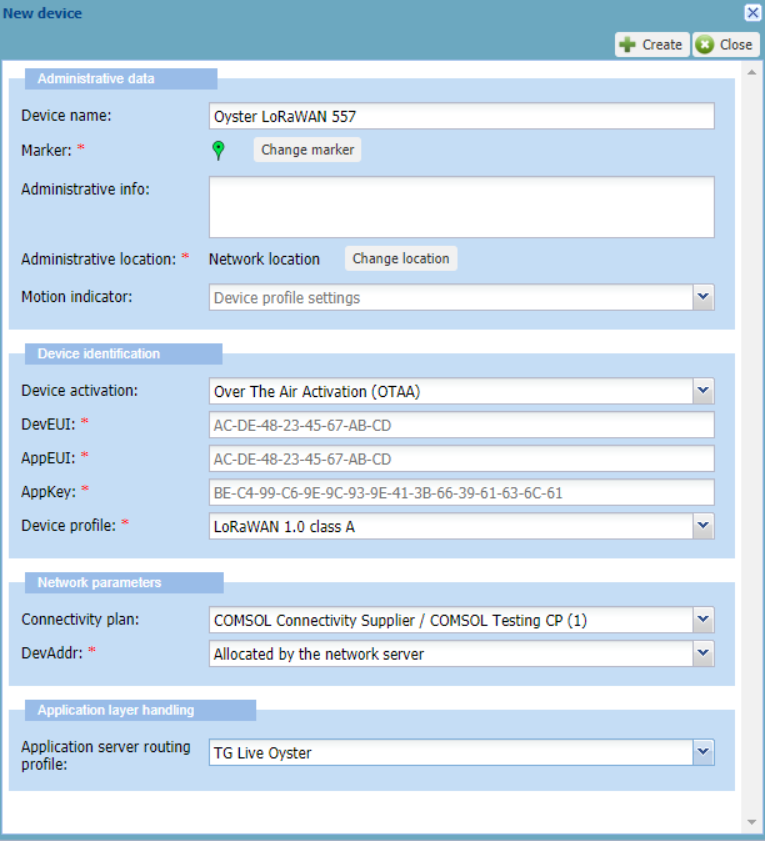
- Fill in the fields in the New Device dialog. Here are some helpful notes:
- The Administrative Data section is entirely user selectable. It will not prevent the device from working. Choose a useful name.
- Only OTAA is supported. ABP is not supported at this time.
- The various keys are available on a sticker that ships with the devices. They can also be found (and copy/pasted) from the config app - this is recommended to avoid typos. The App Key and App EUI may be reconfigured in the config app too. Ultimately, whatever is on the device when deploying should be entered into this dialog.
- Dashes are not required in the keys, and case is not important. AC-DE-48-23-45-67-AB-CD is equivalent to acde48234567abcd.
- Device profile - LoRaWAN 1.0 class A generally works well.
- Your network provider should supply the connectivity plan.
- Leave the DevAddr as Allocated by network server, unless you are an advanced user.
- Be sure to choose the AS routing profile you set up above.

- Editing a device after creation is limited. It does not appear to be possible to change the Dev EUI, App EUI, or AppKey without recreating the device. It is possible to change which Network Routing Profile is assigned to a device. Click the edit icon on the right of the device. In the left-hand menu, under the selected device, there should be a network option. Within that page, it is possible to edit "Network Routing".
5. Create your device in Telematics Guru
- Login to TG. Go to the Manage Assets page.
- Add a new Asset.
- In the device type drop-down menu, select Oyster LoRaWAN or G62 LoRaWAN, depending on the device that you are setting up.
- Enter the DevEUI as the serial number.
- Click Save.
6. Power up your device
- Your device should be ready to power up and join the network.
- Try to do this in a location that you know has good network coverage, and in an area with good GPS signal.
- Once joined, you should see some statistics for the device, including the last uplink time.
- Once the device has obtained a GPS fix, it should transmit an uplink, and it should appear on the live view in TG.
Notes and pitfalls:
- If you see that the device is transmitting in Device Manager (Actility), but nothing is appearing on TG, be sure to check with your LoRaWAN network about opening port 8083 for outgoing HTTP traffic.
- This article covers the standard ThingPark Device Manager. Some networks have rolled their own simplified interface, with Actility in the background. The setup should be similar, but the UI may look different.
