Configure DS18B20 Temp Probe with Hawk

Written by Matthew Clark-Massera
Updated at October 6th, 2023
Table of Contents
The Hawk Ag-Tech1, Agtech2 and RS-1 plug in I/O cards have a 1-wire interface. This can be used to read a DS18B20 temperature sensor.
DS18B20 Details
- Datasheet - Maxim Integrated
- Full probe assemblies
Wiring
The relevant I/Os for the DS18B20 - using the Ag-Tech1 plug-in board on the Hawk are:
| Function | Agtech1 | Agtech2 | RS1 |
| 3V3 Output | 5 | 3 | 5 |
| 1-Wire Input | 8 | 4 | 8 |
| Ground | GND | GND | GND |
Connections are as follows. While the DS18B20 uses the 1-wire interface to transmit the readings, it requires a couple more connections as the sensor needs to be powered.
| DS18B20 Wire | Agtech1 | Agtech2 | RS1 |
| Power (red wire) | Connect to Hawk IO 5 (3V3) | Connect to Hawk IO 3 (3V3) | Connect to Hawk IO 5 (3V3) |
| iButton Signal Line | Connect to Hawk IO 8 (1-wire input) | Connect to Hawk IO 4 (1-wire input) | Connect to Hawk IO 8 (1-wire input) |
| GND (Black wire) | Connect to GND | Connect to GND | Connect to GND |
Some wiring diagrams may indicate a pull-up resistor is required between to pull the iButton signal line to 3V3. This is done interally on the I/O card and not necessary to fit.
Configuration
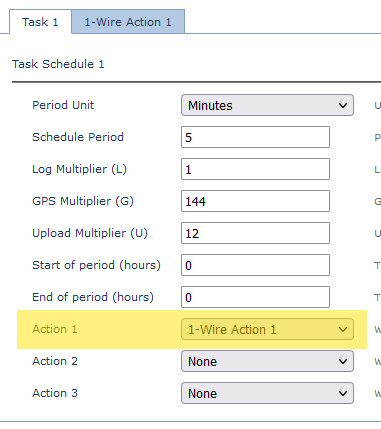
Configure Task
Configure a task schedule, and select 1-Wire Action 1 as an action
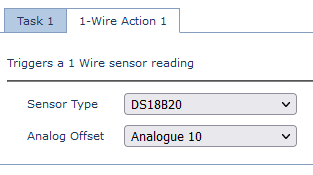
Configure Sensor Analogue
- Add the 1-Wire Action 1 Tab
- Select DS18B20 as the Sensor Type
- Select the Analogue offset - in the below case the temp value will be logged to Analogue 10
Output/Conversion
With the above parameters, the output would be:
| Value | Analogue | Units | Conversion Example |
| Temperature | Analogue Offset Value | °C * 16 | 160 = 10°C |