DM - G150 M12 Harness for Iridium

Written by Cameron Everett
Updated at May 13th, 2025
Table of Contents
There are custom G150 harnesses available to make integration with the G150 as easy as possible.
MOQs and lead times may apply - please contact support for more information.
Cable Details:
You will receive a cable with an M12 connector on one end, and 4 stripped wires on the other, ready to plug into the G150 connector. There will also be a red wire emerging from the cable, ~15cm from the 4 stripped wires.


The red wire will be ~50cm long.
The overall harness length is ~2050 mm. The above image is of a sample with a shorter length.
Process
Insert the end of the cable with the 4 stripped wires through the black G150 nut, then into the G150 cable gland.
Push the stripped wires firmly into the white connector as per the below image:

Plug into the connector on the G150.

Now plug the M12 into the Iridum Edge, plug the red wire into your power supply, and you are good to go!
To configure the parameters to get the Iridium up and running on your G150, please see:
Build your own Iridium Harness
To facilitate out-of-coverage operation - an Iridium Edge can be connected to the G150. To do so requires a special wiring setup.
Iridium Edge Module
The Iridium Edge is a compact modem and antenna unit designed to communicate with the Iridium satellite constellation, ensuring coverage across the entire globe. For the G150, the module connects via a harness using the RS232 protocol.
Connection: The Iridium Edge connects to the G150 via pins on Harness 1 and 2 , which supports the RS232 interface. This allows for straightforward integration with the device. A custom harness can be wired using an M12-8 connector explained below.
Power Requirements: With a cable coming out which is terminated with an M12-8 connector. The Iridium edge module requires a 9-32V power source and will not run on the internal battery of the G150.
By incorporating the Iridium Edge Module with your G150, you can ensure reliable location tracking in areas beyond cellular coverage.

Hardware Requirements
-
G150 Device (standard unit - supplied by DM)
-
G150 Secondary Harness (supplied by DM)
-
Build your own Iridium harness attaching the necessary connectors to the standard G150 harness
-
Build your own Iridium harness attaching the necessary connectors to the standard G150 harness
-
Iridium Edge Module - not supplied by DM, can be sourced via other suppliers
- Iridium Data Plan
Unlike the G120, the G150 does not have a specific Iridium harness, but it supports Iridium Edge module integration through custom wiring. This flexibility allows for the utilization of Iridium satellite communication by adapting the dual 10-pin harness configuration for necessary connections, including power and RS232 interface for data transmission. see the G150 Pin out here.
Connector Requirement: When creating a harness for the G150, a female M12-8 connector is required. This connector is crucial for linking the G150 with the necessary components. Please see the image below.
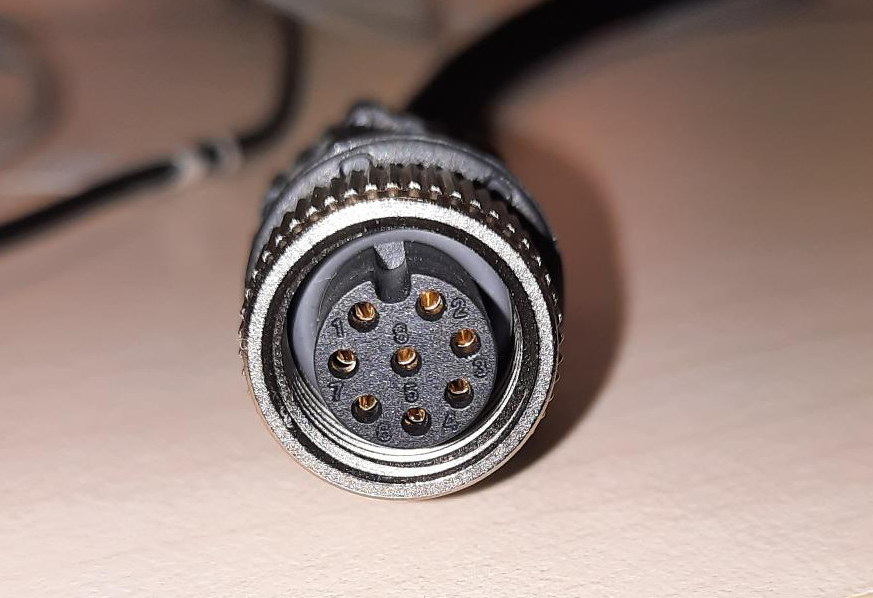
IP67 Rating: The female connector for the G150 should be IP67 rated to preserve the IP67 rating across the connection with the Iridium Edge
Mounting the Iridium Edge: The Iridium Edge must be mounted in a position with an unobstructed view of the sky. A harness length of about 2 meters is recommended to ensure flexibility in mounting for most vehicle types.The colours
Schematic Diagram
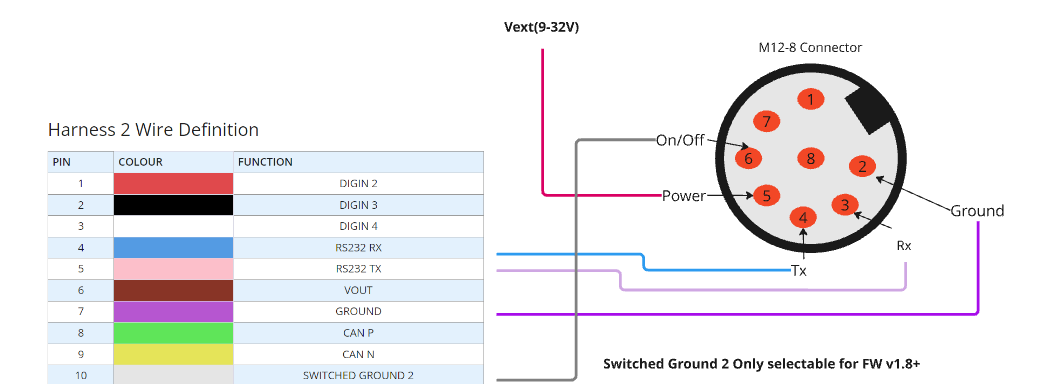
Iridium Edge Pin |
G150 Pin | Comment |
5 (External Power) |
1 on Harness 1 (Ext Power), or loose
|
The Power pin on the Iridium edge module can be joined to the power pin on the G150, so the installer only needs to connect 1 wire to power. |
2 (Ground) |
Ground - 2 or 10 on Harness 1, or 7 on Harness 2 | Any ground on the G150 harness can be used as they are equivalent. |
3 (Edge RX) |
5 on Harness 2 (RS232 TX) | |
4 (Edge TX) |
4 on Harness 2 (RS232 RX) | |
6 (On/Off) |
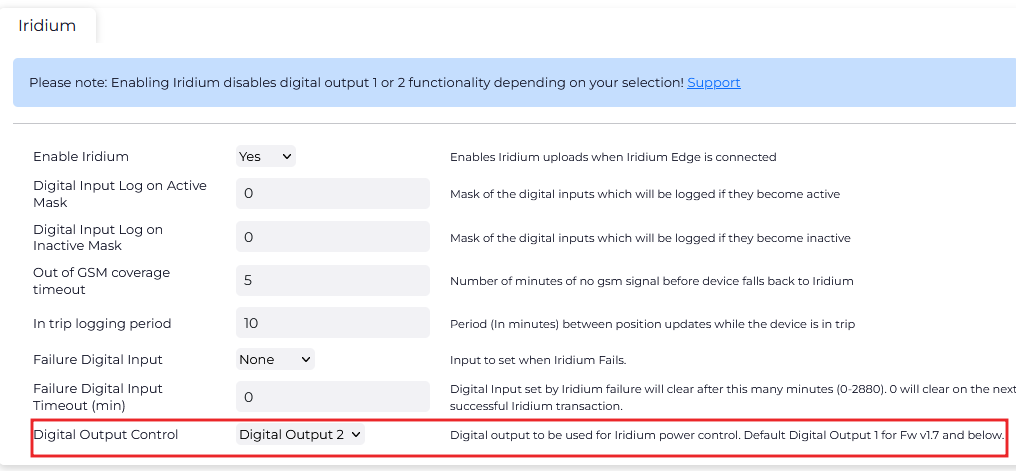
8 on Harness 1 (Switched Ground 1) or 10 on Harness 2 (Switched Ground 2) |
When out of coverage, this is used to turn on the Iridium Edge.
It is simpler to wire if Switched Ground 2 is selected in parameters (as shown below) Requires FW 1.8+ |